Thalgrimore and Sorrow Harvester's Double Weaken Strategy | Splinterlands Social Media Challenge

This week’s Splinterlands Social Media Challenge gave me a battle that was both exciting and surprising. The modifiers in play were Blood and Sunder along with Fog of War, which completely changed the way I had to think about my team composition. With a 99 mana cap, I had plenty of room to experiment with powerful units, and I decided to build around the Archon: Thalgrimore and his Death lineup.
Thalgrimore’s -1 health ability affects only enemies, which already creates an advantage passively. Combined with Sorrow Harvester’s Weaken ability, enemies start with -2 maximum health right from the beginning. This synergy formed the foundation of my strategy and from there I built a lineup that balanced strong frontline defense with steady damage from the backline.
In this post, I’ll go over the modifiers, my team choices, how the battle played out and what I learned from facing an unexpected Earth lineup.
Battle Ruleset Breakdown
Modifiers in this battle:
- Blood and Sunder: All units gain Corrosive Ward, which reduces the attacker’s armor and maximum armor by 2 when struck by a melee attack.
This makes strategies relying on melee units riskier since they’ll gradually reduce themselves of armor. - Fog of War: Units lose Sneak, Snipe, and Opportunity.
This drastically changes how positioning works because you can’t rely on flanking units with Sneak, Snipe or Opportunity to target specific enemy units. Everyone is forced to fight head-on.
My Thoughts:
These two modifiers together encourage building teams that rely on magic damage and clever positioning. Armor is less valuable due to Blood and Sunder, and Fog of War eliminates the usual danger of backline being threatened by Sneak. Knowing this, I leaned heavily on strong tanks up front and reliable damage dealers in the middle and back.
Team Composition

Summoner: Archon: Thalgrimore
- Thalgrimore was the perfect choice here. His -1 health debuff to all enemies complements Sorrow Harvester’s Weaken, immediately reducing enemy health to eliminate them faster. With this combo, I can start the fight with enemies already lowered health that sets the tone for the entire match.
Units Chosen

- Nim Guard Captain – Main Tank
- With his Void ability, Nim Guard Captain reduces incoming magic damage by half. Since Frontier Mode enemies often has low magic damage, Void is incredibly effective. As the frontline tank, he absorbed the main damage while negating half of the enemy's magic attacks. Void has a special condition where if the attack is 1 magic attack, it becomes 0 nullifying some of the enemy magic attacks completely.
- New Beluroc Aegis – Secondary Tank with Taunt
- Positioned second, this unit’s Taunt ability redirected enemy range and magic attack away from weaker units. Even though he couldn’t attack from that spot, his role as a damage sponge helped reduce the pressure on Nim Guard Captain for a bit.

- Great Bear Druid - Third Tank with Melee and Magic Attacks
- While its melee attack couldn’t be used from the third position, the 1 magic damage still chipped away consistently at the enemy. With high mana available, Great Bear Druid was a reliable midline option that blended good health and magic attack. I usually pick him up when the battle has high mana.

- Little Sister - Magic Attack with Scaling Life Leech
- This legendary unit starts small with just 1 magic attack and Life Leech, but over time can grow into a serious threat if kept alive. Life Leech allows Little Sister to gain 1 health everytime its attack hits. With Taunt protecting her early on, Little Sister had the potential to snowball into a high health unit as the battle progress making her another possible tank.

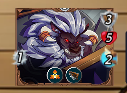
- Sorrow Harvester - Complementing Unit for Thalgrimore
- The backbone of my synergy with Thalgrimore, Sorrow Harvester’s Weaken further reduces enemy health. Starting every enemy with -2 maximum health meant they can be eliminated much faster than normal. On top of that, Sorrow Harvester’s 2 magic attack made her a reliable attacker.

- Black Widow - Back Defense Range Attacker
- Though expensive at 8 mana, Black Widow contributes as a solid range unit with 2 attack, decent health, and armor. She gave my lineup some extra punch to handle higher health enemies. If Fog of War isn't the modifier in this battle as well, Black Widow is a good unit to entrust your back with. The armor is really good as a blocker against Sneak and the range attack allows her to attack from a distance.
The Battle
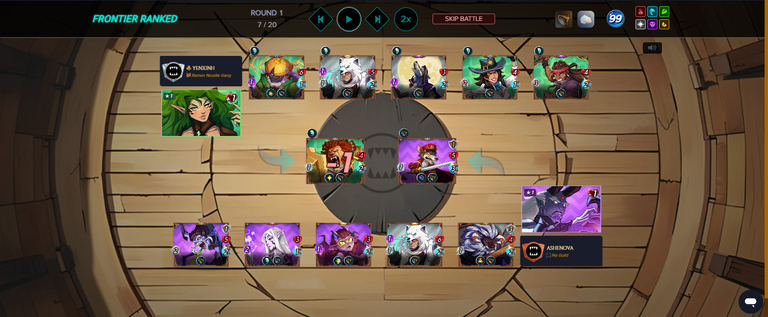
Opening Rounds:
The opening moments played out as expected: New Beluroc Aegis absorbed the brunt of enemy damage at first due to Taunt, while Nim Guard Captain soaked up some of the attacks mainly from their main tank. My backline began steadily chipping away with magic attacks. The -2 health from Thalgrimore and Sorrow Harvester were immediately noticeable as enemy units looked weaker from the start. Unfortunately, some of the strategy were countered by the enemy Archon, Aurelia, giving their team +1 health so I only had -1 health to their team instead of -2 health.
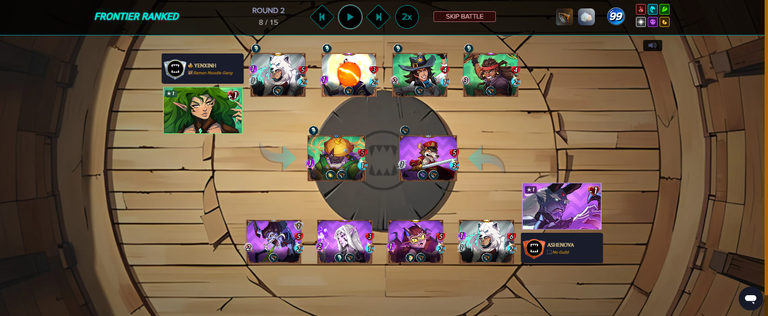
Mid-game:
Things became more difficult once my New Beluroc Aegis fell while their team has all of the units still standing. My opponent had chosen an Earth team. This was a smart choice on their part because Earth has powerful ranged attackers like Wilhelmdale Deputy and Kicking Roc. These units deal consistent high damage and are unaffected by Blood and Sunder since the modifier only affects melee units. With Fog of War active, I couldn’t draft Sneak units to deal with them directly, which left them free to rain down damage.
In Round 2, Dread Tafarian also goes down giving me hope. Since the enemy's main tank is now down, I now have some access to their back line.
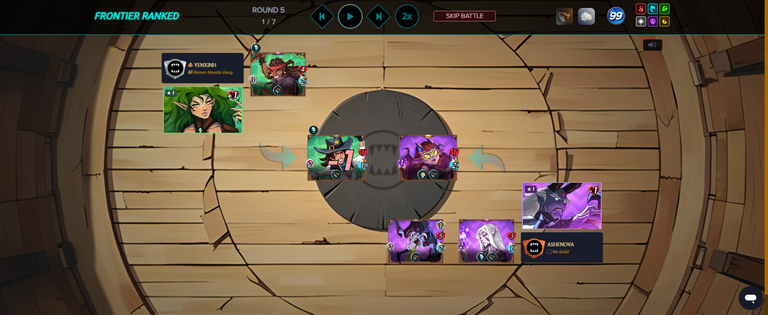
Final Rounds:
Despite the pressure, my lineup held strong. Nim Guard Captain’s Void ability nullified much of the enemy’s weak magic attacks, while my midline units continued to chip away at their team. The fight was closer than I anticipated because of the strong ranged attacks from the enemy Earth team, but the initial health debuffs gave me the edge I needed.
Around Round 5, I was able to finally breath and relax. The enemy team only have the two ranged units and I have three, two magic attacks and a range. I have the advantage at this point since range units cannot attack while in 1st position. This means they can only attack one per round and if I eliminate one of the range units, the last standing one cannot attack anymore.
👉 Watch the full battle replay here
https://splinterlands.com/battle/sl_e55d0ed8b993d17797987f4b61195621
Results & Reflection
What strategy I was aiming for:
My main strategy revolved around health reduction. By combining Thalgrimore and Sorrow Harvester, every enemy started weakened with -2 max haelth, making them easier to eliminate. Tanks like Nim Guard Captain and Beluroc Aegis bought time, while Little Sister gets more health through Life Leech. Black Widow applied some pressure as well from behind.
What surprised me:
The enemy Earth lineup was tougher than expected. With Fog of War blocking Sneak strategies, I had no way to directly target their ranged attackers. This allowed Wilhelmdale Deputy and Kicking Roc to keep firing from the backline. It was a smart counterpick that almost swung the game against me. I also lose a lot against Earth lineup and honestly, I don't know why. I tried them before but they never worked for me.
What I learned:
This battle reinforced the value of Nim Guard Captain’s Void. Against enemies with weak magic attack, he becomes nearly unbreakable. The Thalgrimore + Sorrow Harvester synergy also proved devastating, giving me a reliable combo to build around in high-mana matches. Even though I struggled against Earth’s ranged units, my lineup showed strong promise to adapt in a lot of situation including this one.
Closing Thoughts
This was one of the most interesting battles I’ve played recently. The modifiers of Blood and Sunder plus Fog of War forced me to think carefully about how to protect my backline while dealing with enemy threats head-on. I’m glad I tested Thalgrimore in this setup, because the -2 health synergy feels powerful in almost any situations. A 3 health unit immediately become 1 health and that's even before the battle start which is great.
Splinterlands constantly surprises me with how different each modifier combinations can feel, and this match was another reminder of the importance of good synergy among your team. I’ll definitely keep refining this lineup and experimenting with variations for future battles.
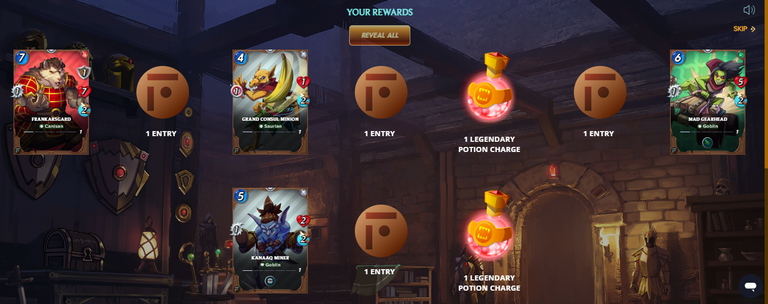
With some grinding, I also gained some new cards and huge useful rewards for winning my battles and increasing my rank. I'll continue battling and getting on higher ranks and hopefully get better rewards.

Posted Using INLEO
View or trade
LOHtokens.@ashenova, You have received 1.0000 LOH for posting to Ladies of Hive.
We believe that you should be rewarded for the time and effort spent in creating articles. The goal is to encourage token holders to accumulate and hodl LOH tokens over a long period of time.
https://bsky.app/profile/did:plc:gll6fcm6ppi2g7t2hj2xq7ky/post/3lynidytawk2n
https://bsky.app/profile/did:plc:gll6fcm6ppi2g7t2hj2xq7ky/post/3lynidytawk2n
The rewards earned on this comment will go to the author of the blog post.
View or trade
LOHtokens.@ladiesofhive, you successfully shared 0.1000 LOH with @ashenova and you earned 0.1000 LOH as tips. (33/50 calls)
Use !LADY command to share LOH! More details available in this post.
!LADY
View or trade
LOHtokens.@hive-124452, you successfully shared 0.1000 LOH with @ashenova and you earned 0.1000 LOH as tips. (9/50 calls)
Use !LADY command to share LOH! More details available in this post.
Thanks for sharing! - @alokkumar121

Congratulations @ashenova! You have completed the following achievement on the Hive blockchain And have been rewarded with New badge(s)
Your next target is to reach 400 upvotes.
You can view your badges on your board and compare yourself to others in the Ranking
If you no longer want to receive notifications, reply to this comment with the word
STOP