Water Splinter still Reigns in Modern
Every of us or players has their own signature strategy or go-to lineup that best complements their favorite Splinter, often built around a deck they feel most comfortable and confident deploying in various battles. The condition to a more chance of winning a match lies in how well your team synergy aligns with the active rule sets and abilities in play, making adaptability and understanding your cards important. In this today's blog, I’ll be diving into my experience grinding through the modern format—sharing not only my strategies but also showcasing a few basic lineups that I frequently rely on. Whether it’s a well-rounded deck or a unique card that sets the quality, I’ll guide you through how I discuss matchups using thoughtful combinations that bring out the strengths of my chosen Splinter.

To my own part, I choose to use or rent Mar Torren Seeker primarily because it's very affordable to rent and brings solid utility to a Water Splinter deck. For budget conscious players or those building around specific abilities, this card offers great value, especially in battles where strategic positioning and ability synergy are important. Its cost-effectiveness makes it easy to include in lineups without sacrificing mana for stronger cards in other roles, allowing you to stretch or expand your mana cap while still fielding a competent defender or support damage unit or more damage dealers of your team line-up.
Mar Torren Seeker is a common Rebellion card from the Water Splinter that comes with a set of very useful abilities: Snipe, Dodge, and Phase. With base stats of 9 health, 5 speed, 2 ranged damage, and a low mana cost of just 4, this card stands out in certain matchups. It’s particularly effective when facing opponents who use Snipe-heavy strategies, as placing Mar Torren Seeker in the second or even first position allows it to take incoming hits while long ranged damage. Thanks to its high speed and defensive skills like Dodge and Phase, it can evade many attacks, making it a strong frontline or secondary tank—especially in teams built around ranged and magic attackers where having a midline tank can shift the tide of battle.

Into the battle: https://splinterlands.com/battle/sl_b4e51168e6ac4d1b559ab7f37d603c09
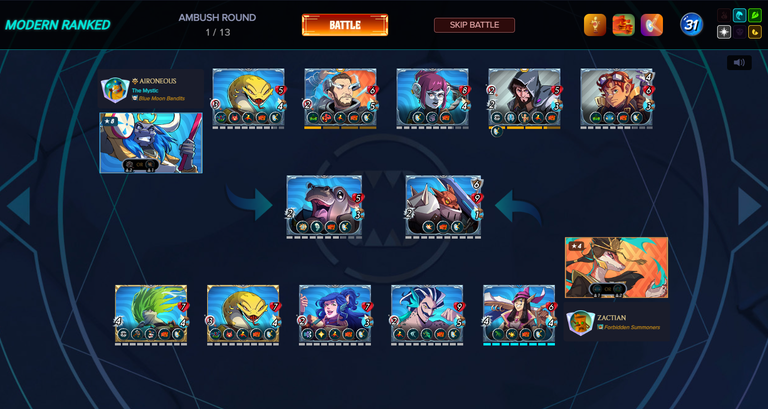
In this particular battle, the rule sets were Target Practice, Heavy Hitters, and Counterspell, with a mana cap of 31, and only Fire and Death elements were inactive. Given these conditions, I chose to use the Dragon summoner Akane in combination with the Water element, specifically to take advantage of Akane's Ambush ability. For my lineup, I deployed Chaos Rear Guard in the front, followed by Pirate Eight, Mar Torren Seeker, Mar Torren Trader, Sultry Barmaid, and Tidal Tsunamist. My strategy was built around combining ranged and melee damage effectively, while leveraging Mar Torren Seeker’s high speed and defensive capabilities under the Target Practice rule set, which prioritizes backline attackers. This allowed me to mitigate damage and make better use of my mid-line units, especially those with useful support or evasive abilities.
On the other hand, my opponent chose Prophet Rosa as the summoner, also using the Water element. The opponent strategy seemed to revolve around boosting ranged damage, particularly for Bren Palesworn and Conclave Artificer. Their lineup included Stampeding Calf, Sultry Barmaid, Archmage Yabanius, Daigendark Surveyor, Bren Palesworn, and Conclave Artificer. Notably, their use of Archmage Yabanius—a high-value legendary card, even at level 1—signaled an intent to maximize impact despite its rarity and cost. Their formation leaned heavily into ranged offense, which matched the Target Practice and Heavy Hitters rule sets well. However, just like my lineup, they opted to avoid using magic attackers, clearly due to the Counterspell rule set which punishes magic users with reflected damage. Both teams adapted to the rule sets in unique ways, and the match showcased a balance of strategy, value-based card choices, and the importance of understanding how to counter or avoid specific rule set disadvantages.
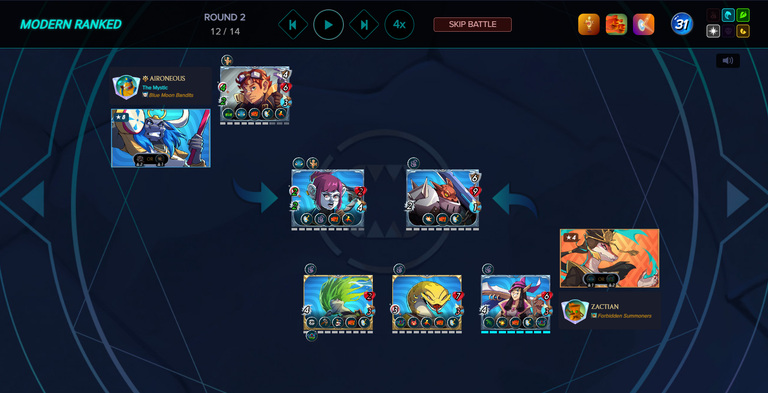
As the battle progressed, the opponent struggled to break through the strong combination of my the twin Mar Torren cards—Seeker and Trader. The Seeker played a key role in evading several attacks thanks to its high speed and Dodge ability, effectively stalling the enemy's offense. Meanwhile, the Trader’s Self-Heal allowed it to sustain itself in the third position, stepping up as a reliable secondary tank once the Seeker took enough damage or been defeated. Although the Seeker was eventually defeated, the Trader held the line just long enough for my front-line melee attackers to continue applying pressure. This sustained frontline strength allowed me to dominate in melee combat, forcing the opponent into a tough position and making it difficult for them to recover, ultimately giving me the upper hand in the match.
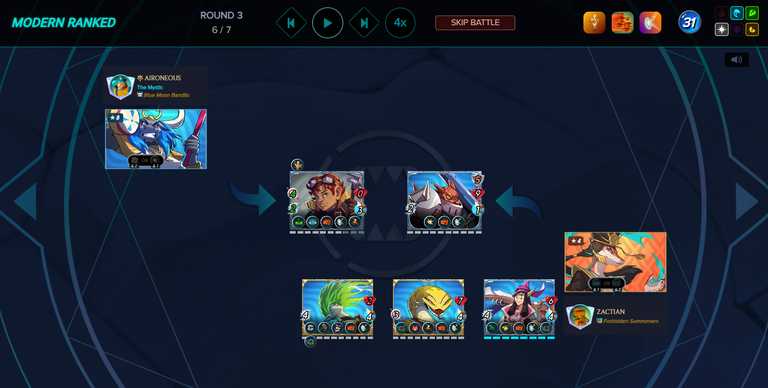
With that, I was able to secure victory over my opponent through a well-planned lineup and strategic positioning. By effectively maximizing the combo between my cards' abilities and the rule sets in play, I gained a strong competitive advantage—even against an opponent with more powerful or unique cards.
If you've just return or new to new mechanics of newly introduced modern and conclave arcana set, feel free to visit this post: https://peakd.com/hive-13323/@splinterlands/introducing-conclave-arcana

A Big Thanks! For supporting me, being here, and coming this far. I hope this strategy assists you with some of your battles with these rule sets in modern format conclave and rebellion sets.
Use my referral link: Click Here
Credits:
Edited the Design photo Splinterlands Modern League using PicsArt
Screenshot In-game splinterlands
Thanks for sharing! - @clove71
