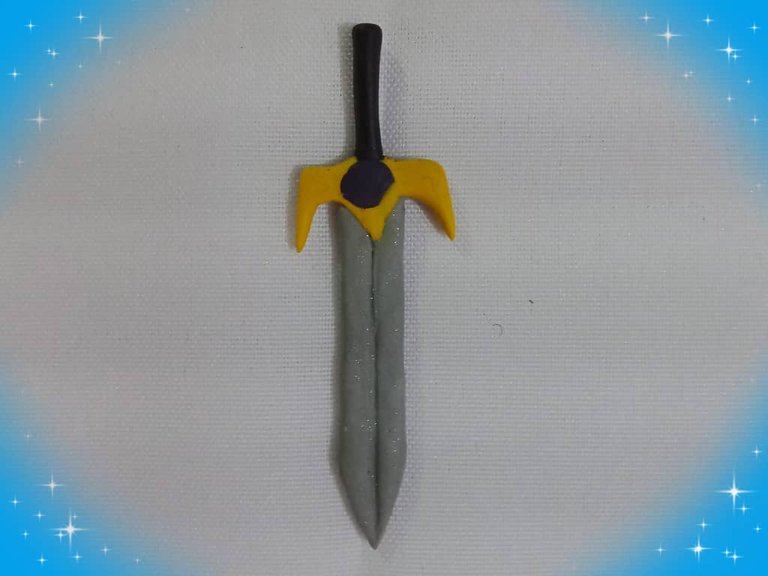
DIY; Espada inspirada en Imperial Knight ** DIY; Sword inspired by Imperial Knight [Esp / Eng]

Saludos amigos creativos y comunidad @diyhub, es mi deseo que tengan un excelente fin de semana en unión de sus seres queridos, me siento muy feliz de compartir un nuevo proyecto de moldeado con masa flexible, tomando como referencia a los personajes de Splinterlands, en esta ocasión el proyecto es una espada que lleva el personaje Imperial Knight en la mano, la espada tiene los colores; dorado, gris y el mango es de color de color negro, esta espada se suma a mi coleción de fan art de Splinterlands, es la tercera que moldeo, me gustó el resultado y los colores, el círculo morado en la base de la hoja se ve muy bien y resalta en el color dorado. Les muestro el proceso de elaboración.
Greetings creative friends and community @diyhub, it is my wish that you have an excellent weekend with your loved ones, I am very happy to share a new molding project with flexible dough, taking as reference the characters of Splinterlands, this time the project is a sword that the character Imperial Knight carries in his hand, the sword has the colors; gold, gray and the handle is black, this sword joins my collection of Splinterlands fan art, it is the third that I mold, I liked the result and the colors, the purple circle at the base of the blade looks very good and stands out in the golden color. I show you the elaboration process.


Materiales
Masa flexible
Estecas
Superficie plana para moldear
Pintura al frío
Pegamento
Materials
Flexible dough
Cutting boards
Flat surface for molding
Cold paint
Glue

PROCEDIMIENTO
Para moldear la espada y trabajar más rápido iniciamos dividiendo la masa en pequeñas porciones, luego añadimos pintura y mezclamos hasta obtener el color deseado. Así no tendremos interrupciones para armar las siguientes piezas, porque ya la masa tiene el color correspondiente, en esta oportunidad usaremos los colores dorado, gris,morado y negro.
Luego de mezclar las pinturas con la masa, formamos varias bolas, una de cada color que usaremos, las aplanamos y partiendo de las bolas de masa empezamos a moldear, la primera pieza que haremos será el mango, este es de color negro, moldeamos un cilindro delgado y con las estecas aplanamos los extremos.
PROCEDURE
To shape the sword and work more quickly, we start by dividing the dough into small portions, then add paint and mix until the desired color is achieved. This way, we won't have to interrupt the assembly of the next pieces, since the dough already has the corresponding color. This time, we'll use gold, gray, purple, and black.
After mixing the paints with the dough, we form several balls, one of each color we'll be using. We flatten them, and starting from the dough balls, we begin to shape. The first piece we'll make will be the handle. This is black. We shape a thin cylinder and use the stakes to flatten the ends.

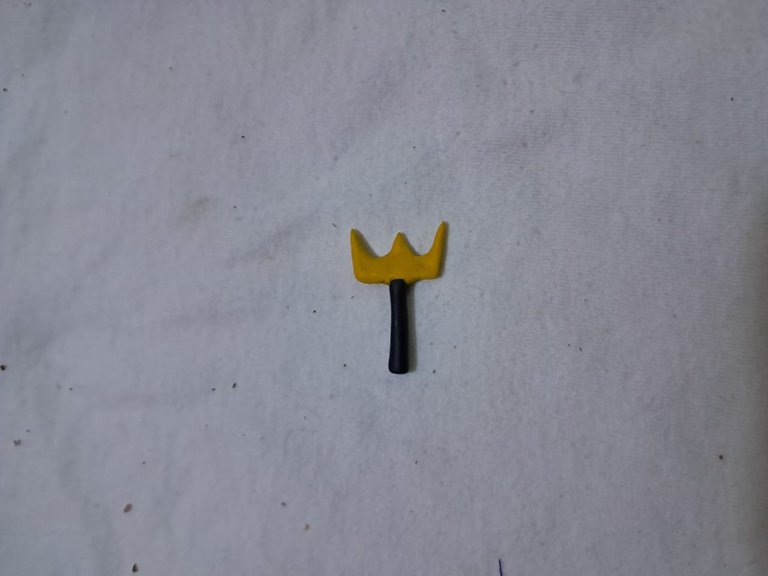
Luego haremos la pieza que va en la parte de arriba del mango, moldeamos una figura similar a la letra E con masa dorada, con ayuda de las estecas afilamos las puntas de la E y formamos dos semi arcos, entre las puntas, la punta del centro debe quedar más pequeña que la de los lados. Con las manos y las estecas, alisamos la parte de abajo y unimos al mango, hacemos un agujero para fijarla al mango, agregamos pegamento a ambas piezas y las dejamos secar durante quince minutos o más, para que compacten y queden fuertes, ya que serán la base de la hoja.
Next, we'll make the piece that goes on top of the handle. We mold a shape similar to the letter E with gold dough. Using the stakes, we sharpen the tips of the E and form two semi-arches. Between the tips, the center point should be smaller than the sides. Using our hands and the stakes, we smooth the bottom and attach it to the handle. We make a hole to secure it to the handle. We add glue to both pieces and let them dry for fifteen minutes or more, so that they compact and become strong, since they will be the base of the blade.


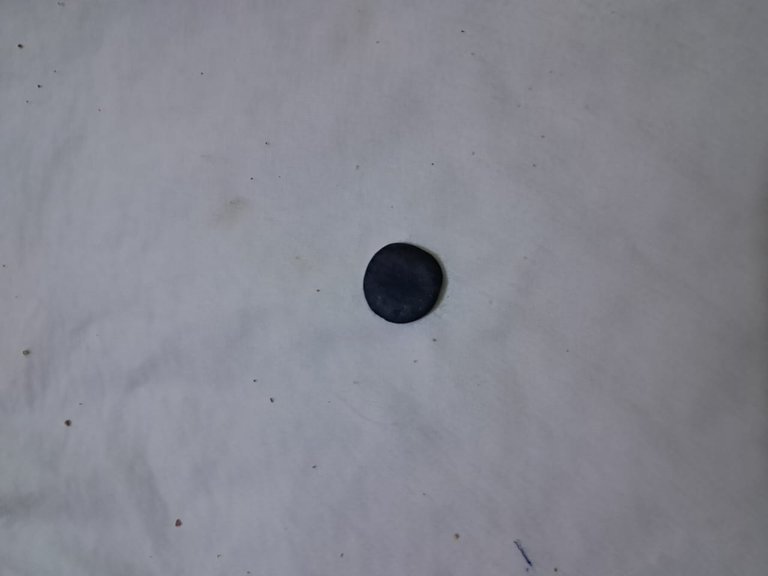
Con la masa morada, moldeamos dos círculos pequeños o botones, aplanamos y alisamos los bordes con las manos, colocamos pegamento y unimos los botones en la parte delantera y trasera de la pieza dorada, al igual que en el paso anterior, dejamos secar durante 10 o 12 minutos.
Para obtener un tono diferente y oscuro del color morado, agregué dos gotas de pintura negra y azul a la masa morada y mezclé hasta integrar completamente.
Using the purple dough, we shape two small circles or buttons, flatten and smooth the edges with our hands, apply glue, and attach the buttons to the front and back of the gold piece, just like in the previous step. Let it dry for 10 or 12 minutes.
To get a different, dark shade of purple, I added two drops of black and blue paint to the purple dough and mixed until fully integrated.


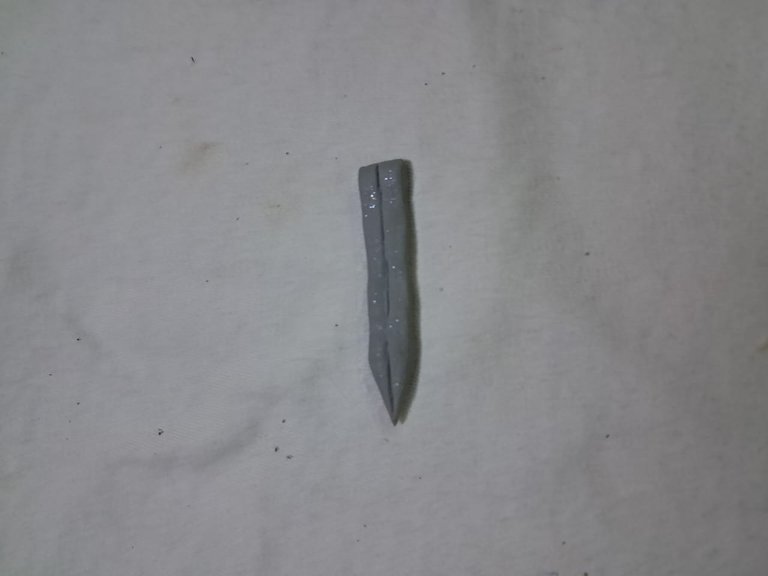
Para hacer la hoja de la espada, tomamos la masa gris y añadimos tres gotas de pintura plateada, mezclamos muy bien, esta pintura agrega un efecto de brillo que simula el metal, moldeamos un rectángulo delgado y con ayuda de las estecas afilamos la parte de arriba hasta formar un triángulo, en la parte de abajo aplanamos también, de manera que nos quede lisa y recta.
Finalmente, con ayuda de las estecas, trazamos poe el centro de la hoja, una línea recta, desde la punta del triángulo hasta la parte de abajo, hacemos el trazado de la línea varias veces para dar profundidad, luego agregamos pegamento en la parte de abajo y unimos a la pieza dorada, hacemos una pequeña abertura en la punta central y la base de esta pieza para que cubra la hoja, colocamos nuevamente pegamento y dejamos secar por un largo tiempo, puede ser entre dos y tres días para que las piezas compacten y peguen bien pegada, así ya está terminada una espada inspirada en Splinterlands.
To make the sword blade, take the gray clay and add three drops of silver paint. Mix well. This paint adds a shiny effect that simulates metal. Shape a thin rectangle, and with the help of the cutting tools, sharpen the top into a triangle. Flatten the bottom as well, leaving it smooth and straight.
Finally, using the cutting tools, draw a straight line down the center of the blade, from the tip of the triangle to the bottom. Trace the line several times to add depth. Then, add glue to the bottom and attach it to the gold piece. Make a small opening at the center tip and the base of this piece to cover the blade. Apply glue again and let it dry for a long time—it can take two to three days—for the pieces to compact and stick together. This is how your Splinterlands-inspired sword is finished.

Les muestro el resultado
I show you the result

Gracias por Leer.
Thank you for reading.
Hasta Luego!
See you later!
Translated with https://www.deepl.com/translator
    All images are of my authorship captured with an Alcatel phone.


      Todas las imágenes son de mi autoría capturadas con un teléfono Alcatel.
Thank you so much
Very good, it is nice to see what you can do with your hands in our community, and also that you do it excellently. thanks for that.
selected by @jesuslnrs
Greetings, brother, I'm glad you liked the Splinterlands-inspired project.
Have a great day!
Thanks for sharing! - @cieliss

Thanks for the support.
Best regards!