Flor de limpiapipas inspirada en el Mutilador de ranúnculos, concurso de arte Splinterlands semana 368. (ESP - ENG)
Saludos queridos miembros de la comunidad Hive Diy sean bienvenidos a mi blog, les deseo un excelente domingo y que esta nueva semana esté llena de cosas buenas y oportunidades, les cuento que esta semana me encuentro realizando actividades de la universidad y sacando un poquito de tiempo para realizar algo lindo de manualidades, así que hoy paso por acá para compartir mi participación en el concurso de arte Splinterlands semanal.
Greetings, dear members of the Hive DIY community, welcome to my blog. I wish you a wonderful Sunday and that this new week is filled with good things and opportunities. I'd like to tell you that this week I'm doing university activities and finding a little time to do some nice crafts, so today I'm stopping by to share my participation in the weekly Splinterlands art contest.

En esta oportunidad para el concurso de arte Splinterlands semana 368, me inspiré en la carta Buttercup Mauler que en español significa mutilador de ranúnculos, suele parecer extraño este nombre pero hace referencia a mutilador de flores silvestres amarillas, es por ello que al visualizar la carta este personaje lleva en sus manos flores con dicha característica.
This time for the Splinterlands art contest week 368, I was inspired by the card Buttercup Mauler which in Spanish means buttercup mutilator, this name usually seems strange but it refers to mutilator of yellow wildflowers, that is why when viewing the card this character is holding flowers with that characteristic.
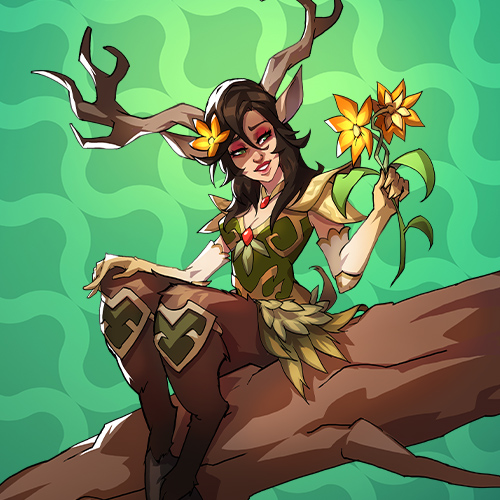
Buttercup Mauler
Para recrear esta carta realicé una flor en color amarillo como la que el personaje lleva en su mano, elaborada en limpiapipas ideal para decorar espacios, o incluso puede ser útil como obsequio, esta flor queda muy linda con este material y hace honor a la carta, a continuación les muestro los materiales y el paso a paso.
To recreate this card, I made a yellow flower like the one the character is holding in his hand. Made from pipe cleaners, it's ideal for decorating spaces or can even be used as a gift. This flower looks very pretty with this material and honors the card. Below I show you the materials and the step-by-step instructions.

| Materiales | Materials |
|---|---|
| Limpiapipas amarillo | yellow pipe cleaner |
| Limpiapipas verde | green pipe cleaner |
| Limpiapipas color piel | Skin-colored pipe cleaners |
| Cinta floral verde | Green floral ribbon |
| Silicón, tijera | Silicone, scissors |
| Palillo | Toothpick |
| Sombras de ojos | Eyeshadows |

Paso a paso / Step by step
El primer paso que voy a realizar será seleccionar los limpiapipas amarillos a utilizar, voy a tomar nueve de ellos y los dividimos en la mitad cada uno, cortamos con la tijera.
En total obtendremos 18 piezas, ahora voy a formar 6 grupos de 3 limpiapipas cada uno, este es el comienzo para comenzar a formar los pétalos.
The first step I'm going to take is to select the yellow pipe cleaners I'm going to use. I'm going to take nine of them and divide each one in half, cutting them with scissors.
In total, we'll have 18 pieces. Now I'm going to form 6 groups of 3 pipe cleaners each. This is the beginning of forming the petals.
 |  |  |
|---|
A parte voy a seleccionar 6 limpiapipas pero sin cortar, ahora voy a tomar un grupo de tres piezas, doblamos en la mitad y en el centro colocamos el limpiapipas sin cortar, ahora unimos detenidamente cada punta del limpiapipas junto al limpiapipas más largo.
I'm going to select 6 uncut pipe cleaners. Now I'm going to take a group of three pieces, fold them in half, and place the uncut pipe cleaner in the center. Now, carefully join each tip of the pipe cleaner together with the longest pipe cleaner.
 |  |  |
|---|
Voy a unir todas las puntas y con uno de los extremos más largos cerramos el pétalo dando varias vueltas, cortamos uno de los excedentes. Este paso lo voy a realizar para el resto de los pétalos, en total serían seis.
I'm going to join all the tips together, and with one of the longer ends, we'll close the petal by making several turns. We'll cut off one of the excess. I'll do this step for the rest of the petals, making a total of six.
 |  |  |
|---|
Ahora con el pulgar de la mano voy a dar forma al pétalo, debe quedar inclinado hacia atrás la punta, ahora el siguiente paso es unir tres pétalos, el resto los vamos a pegar en el espacio vacío entre cada uno.
Para el centro de la flor utilicé un limpiapipas de color piel, enrollamos en un palillo y realicemos un círculo, luego pegamos en el centro de la flor, ahora el siguiente paso es realizar las hojas.
Now, with my thumb, I'll shape the petal. The tip should be tilted backward. The next step is to join three petals together. We'll glue the rest in the empty space between each one.
For the center of the flower, I used a skin-colored pipe cleaner. I wound it around a toothpick and made a circle. Then, I glued it to the center of the flower. Now, the next step is to make the leaves.
 |  |
|---|
 |  |
|---|
Para las hojas voy a utilizar dos limpiapipas color verde para cada una, debemos cortar un limpiapipas en la mitad y uno completo lo vamos a colocar en el centro, siguiendo el mismo paso que realicé con los pétalos de la flor, con la diferencia de que se verán más delgadas.
For the leaves, I'm going to use two green pipe cleaners for each one. We must cut one pipe cleaner in half and we will place a whole one in the center, following the same step that I did with the flower petals, with the difference that they will look thinner.
 |  |
|---|
 |  |
|---|
Para dar ese toque de color entre naranja y amarillo, voy aplicar sombra de ojos en los bordes en todos los pétalos hasta obtener un color intenso, para la parte trasera realicé una hoja del mismo color del centro, solo deberás utilizar dos limpiapipas, por cada uno voy a dividirlo en tres partes y unimos a la flor.
To give that touch of color between orange and yellow, I will apply eyeshadow on the edges of all the petals until I get an intense color. For the back, I made a leaf of the same color as the center. You will only have to use two pipe cleaners. For each one, I will divide it into three parts and join them to the flower.
 |  |  |
|---|
El siguiente paso es colocar un palillo de madera en el centro de la flor, ahora voy a cubrir con cinta floral verde, así mismo unimos las hojas al palillo y terminamos de cubrir. Lo bueno es que puedes ajustar la dirección en qué va la flor, se puede mover gracias a qué el limpiapipas es flexible. De esta forma terminé esta bella flor inspirada en el mutilador de ranúnculos.
The next step is to place a wooden skewer in the center of the flower. Now I'll cover it with green floral tape. We'll also attach the leaves to the skewer and finish covering it. The great thing is that you can adjust the direction the flower faces; it can be moved thanks to the flexible pipe cleaner. This is how I finished this beautiful flower inspired by the buttercup mutilator.
 |  |
|---|
¿Qué tal les pareció? Muchas por el apoyo y por visitar mi publicación, nos vemos en una próxima oportunidad con más ideas creativas.
What did you think? Thank you so much for your support and for visiting my post. See you next time with more creative ideas.


Más del resultado final:
More of the final result:


Contenido original. - original content.
Los separadores y banner fueron realizados en Canva. - The dividers and banner were made in Canva.
Fotografías tomadas con mi Samsung A55. - Photographs taken with my Samsung A55.
Gif creado desde Giphy / Gif created from Giphy
Traducción de: Google traductor - Translation of: Google translator.
Posted Using INLEO
I love the way you create the flower, you can also try other colors or have a combination on it. 😍