[PART 1] My -in depth- Guide to Making Prince Julian Good Luck Emote


Sources and Materials
Below are the materials I used in this art.
Edited in Canva Pro.
Introduction
A very refreshing way of making art. Making this Prince Julian emote is a breath of fresh air. Normally, I do everything from scratch, manually doing each of the line for the line art.
For this one, it's way easier than I imagined. Since the art is symmetric, most of it was done using a duplication method. In other words, same art for half the effort since I did half of it via duplicating the other parts.

From Splintercards.com
TABLE OF CONTENTS
Use this Table of Contents as a guide for your breaks. Ctrl + F on your keyboard then type the section you wanted to see.
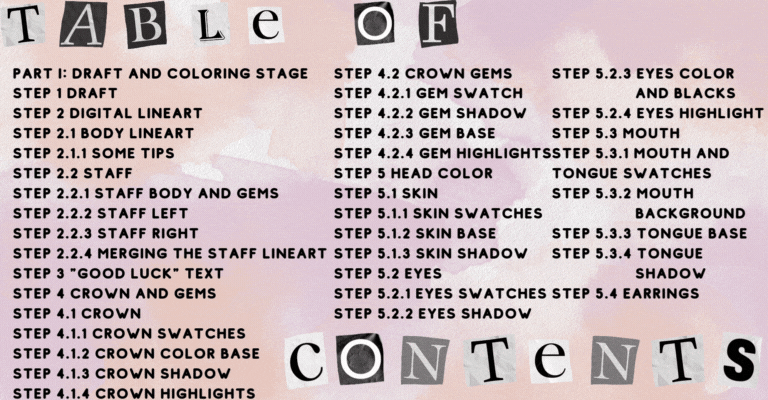


PART I: Draft and Coloring Stage
Step 1 Draft

For the draft, I made Prince Julian cheering with his hands up. The staff he would be holding was also drawn separately so that we can color it properly with the glow and everything like in the original art. The staff would be added later on the animation stage.
Lastly, the word, "Good Luck" will be made as well to cover Prince Julian's lower part.
Step 2 Digital Lineart
For the Digital Lineart, I should've made a 1000 x 1000 canvas first and imported the photo of the drawing. However, I made a mistake and used the paper size, which is 3264 px by 2448 px.

The canvas size would be changed before the animation stage since for an emote, we're required to have a square canvas. Hopefully, there would be no loss of quality at the end.
Step 2.1 Body Lineart

For the body and staff lineart, we're going to use an 8px brush. The whole art would be scaled up later so the size of the pixels may change later. For now, trace all the lines in the draft.
Make sure you use different layers for the body, crown, head, and the staff. Rename them as it should be for easier organization.
The text would be done in a whole different project separately.
Step 2.1.1 Some Tips
For the eyes, make a new layer. Make the left one. Then, duplicate it by right clicking on the layer and selecting duplicate layer. Press ctrl + T to put it in Free Transform, then flip horizontally. Adjust it to the position of the other eyes. This gives you proportioned eyes.
For the crown gems,using the Ellipse tool, make the big egg-like shape in the middle, duplicate it, then resize to smaller one by using the Free Transform or ctrl + T. Once sized down, reposition it to the small gem. Duplicate it 2 more times, and adjust the position to the other two smaller gems.
Step 2.2 Staff
The staff should look like this by the end. It's done separately because of how detailed it is compared to the body. I also wanted to mimic the glowing wand later so it wouldn't look flat.
It would be scaled down later to Prince Julian holding the staff.
Step 2.2.1 Staff Body and Gems
Create a new layer and name it, "Staff Body." Simply trace the staff body using the pen tool. Remember that it's slightly leaning to the side as well and the sides are not a perfect rectangular shape.
The gems are made using the ellipse tool.

Step 2.2.2 Staff Left
Create a new layer and name it, "Staff Left." I added a guide and did one side of the upper part of the staff. The guide is in another layer and another color. Using the pen tool, click on the middle, then I pressed and hold shift and click above it.
The shift button allows you to have straight lines. It can be horizontal, diagonal or vertical. It also works on the line tool.
Trace the one half of the staff from the left to the guide.

Step 2.2.3 Staff Right
Right Click on Staff Left Layer and duplicate layer. Rename it as, "Staff Right." Press ctrl + T to put it in Free Transform, then right click, flip horizontally. Adjust the position to make the staff whole.

Step 2.2.4 Merging the Staff Lineart
Highlight the Staff Body, Staff Left and Staff Right. Right click on it then merge layers. This combines all the layers into one. Rename it as, "Staff Lineart."
You can delete the guide layer as well as we're not going to use it anymore.

You can hide the Draft at this point since we're going to color next and we're not going to use the draft anymore. You can hide the draft by clicking on the eye button at the left side of the layer.
Step 3 "Good Luck" Text
Select File, New, and make the width and height 1000 x 1000 pixels. This makes a new project so we can do the Good Luck text.

Right Click on Background layer, click on layer from background, then okay. This allows us to use the background layer.
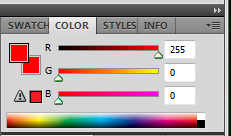
Using the swatch below, fill color using paint bucket or alt + backspace.
The font I used in this text i called Bubbly. You can download it for free in Dafont Website. Type, "Bubbly" on the search box and enter. I used Bubbly by heyy!. It is 100% free and can be used for this.

It's free of virus and really easy to install. Download it, extract then right click on the file and install. Once done, it should how in your font styles inside Photoshop.
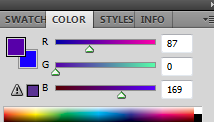
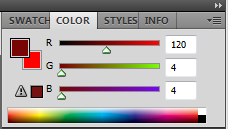
The next step is adding the text. Change the color to this swatch:

Using the Text Tool, click on the workspace and type, "Good Luck." Right Click on it, Warp Text and follow the guide below:

For the text border, we're going to add a layer style called, "Stroke." It should be 8 px wide and white. Click on the "fx" button at the bottom of the layer panel. Click Stroke and follow this guide below:

Get your Magic Wand tool, click outside the text. On the menu bar, click Select, Modify, Contract: 11px. Click on background to make active layer. Using eraser Tool, remove background. (If you cannot erase Background, press ctrl + shift + I. This makes the selection inverse allowing you to affect the background and not the text part.)

Ctrl + D to deselect. Get your Crop Tool and crop to size.

On the menu bar, Save as, Good luck.png. Add to main drawing by drag and dropping the Good Luck.png. Resize to fit the draft.

Step 4 Crown and Gems
Step 4.1 Crown
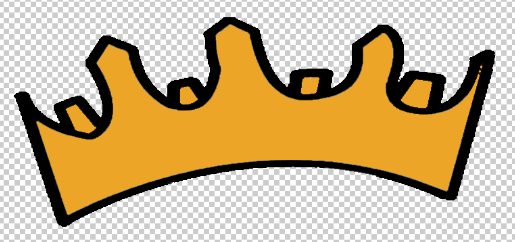
If you want to skip this step, I prepared a pre-made one. You can save this and use it instead if you want or you can follow the steps below and adjust it for your own design.

Step 4.1.1 Crown Swatches
For the crown, we'll use a base, shadow and highlight:


Step 4.1.2 Crown Color Base
First, create a new layer and name it, "Crown Base Color." Fill in the crown with the base color.
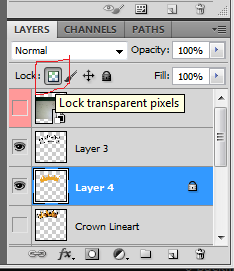
After that, lock the layer using the Lock Transparent Pixels tool on the top of your layer panel.
Step 4.1.3 Crown Shadow
Duplicate that layer, and rename it as, "Crown Shadow."
For the shadow, click on your brush tool, make the size 50 px. Use the shadow swatch, then using the pen tool, make straight lines, right click stroke brush. This makes dark lines on the crown which would serve as shadows.
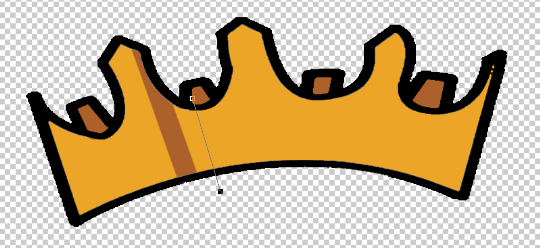
Put shadow on all the back part of the crown like in this part:
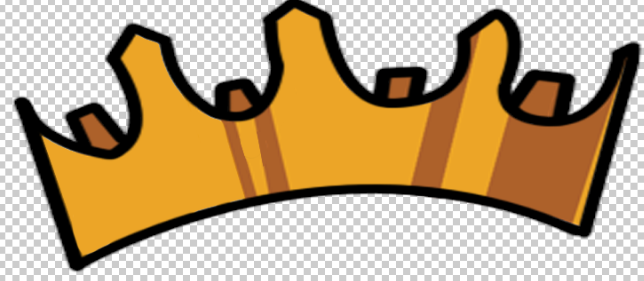
Step 4.1.4 Crown Highlights
The highlights works exactly the same as the shadow. Every bit is exactly the same. The only difference and kind of a note to take is to keep the highlights on one side.
This allows your viewers to imagine that you only have one light source.

Step 4.2 Crown Gems
The gems in the crown actually breaks down the heavy filled colors allowing the highlights and shadow to pop out more. I also added this in the staff for the same reason.
Step 4.2.1 Gem Swatch
There's 4 gems in the middle of the crown. They both have the same colors so we're using these three swatches for the base, shadow and highlights:
Step 4.2.2 Gem Shadow
Since the bigger part is the shadow, we'll start with it for convenience.
Create a new layer and name it, "Gem Shadow." Since the area is small, just use a brush to fill in the area with the base swatch like in this:
Step 4.2.3 Gem Base
Duplicate the Gem Shadow Layer then hide it. Rename the new layer, "Gem Base." Click the Lock Transparent Pixels option on the top of the layers panel.
Using your Ellipse Tool, draw a smaller circle. Change your foreground color to the Base Swatch. Once done, Right click on your workspace, then fill path, then click ok. You can use the picture below as a guide.
Step 4.2.4 Gem Highlights
Duplicate the Gem Shadow Layer then hide it. Rename the new layer, "Gem Highlights".
Using your Ellipse Tool, draw a smaller circle than before. Change your foreground color to the Gem Highlight Swatch. Once done, Right click on your workspace, then fill path, then click ok. You can use the picture below as a guide.
Step 5 Head Color
This part will cover the whole head including the eyes and mouth including the base color and the shadows.
Step 5.1 Skin
The skin parts is composed of the largest part of the head in this art. The shadow is very important as this gives you a realistic feel to determine where the light is coming from.
Step 5.1.1 Skin Swatches
For the skin, we'll use these swatches for the base color and the shadow:


Step 5.1.2 Skin Base
Create a new layer and name it, "Skin Base." The color will be the same as above. Remember to fill in behind the eyes and the mouth as well as we need those filled during the animation stage.

Step 5.1.3 Skin Shadow
Duplicate the layer and rename it as, "Skin Shadow." Use the image below as a guide on where to do the shadow but for a general guide, imagine the light is in front and upper left.

Step 5.2 Eyes
The eyes this time will be different. The original one has just blacks to cover most of the eyes but I decided to use another color to separate the pupils from the rest of the parts of the eyes.
Step 5.2.1 Eyes Swatches
For the main eyes, we'll use 4 swatches. They are for the blacks, the base color, shadow and the highlight:


Step 5.2.2 Eyes Shadow
Create new layer and name it, "Eyes Shadow." Fill in the whole eyes with Eyes Shadow Swatch color.

Step 5.2.3 Eyes Color and Blacks
Duplicate the layer and name it as "Eyes Color." Using your Ellipse Tool, create a circle in the middle of the blacks and fill it with the Eyes Color Swatch:

Create another smaller circle in the middle and fill it with the shadow swatch.

Cut off the sides of the moon-like figure using the Lasso Tool. Fill those with shadow swatch as well like in this picture:

Create another layer and name it as "Eyes Black." Using the Ellipse tool, make a smaller circle and fill it with black swatch.

Step 5.2.4 Eyes Highlight
Create another layer and name it as Eyes Highlight. Using your Pen Tool, create a small dagger like shape like in this picture:

Lastly, create a new layer and place it under the Body Lineart Layer but above the Skin Layer. Fill white color around the eyeballs as seen in this picture:

Do the same on the other side and it should look like this:

Step 5.3 Mouth
We're going to make a few kinds of mouth which would allow our character to mimic speaking. I'll just show how to do one because the rules here can be applied to all of them.
Step 5.3.1 Mouth and Tongue Swatches
For the mouth, we'll use 1 swatch:

And for the Tongue, we'll use 2 for the base and shadow:
Step 5.3.2 Mouth Background
Create a new layer and name it as "Mouth Background." Fill in the area with the Mouth Background Swatch just like this:

Step 5.3.3 Tongue Base
Create a new layer, and name it a "Tongue Base." Fill in the tongue with the tongue base swatch:

Step 5.3.4 Tongue Shadow
Duplicate the layer and name it as "Tongue Shadow" and fill in the tongue with the tongue shadow swatch:

Step 5.4 Earrings
Create a new layer and name it "Earrings." We'll be using these two swatches as Earrings Base Swatch and Earrings Shadow Swatch:


Color the two circles like this:

Lock it with the Lock Transparent Pixels, then color a quarter of it using a small brush using the Earrings shadow swatch like this:

It should look like this when combined with everything.

Step 6 Body Color
For the body, we'll separate it to clothes, lining and the hands. Each of them have different swatches to be used so it would be confusing if I include all of them in just one segment.
Step 6.1 Clothes
Prince Julian wears blue robe with golden lining. The middle lining though is a bit pale compared to the arm lining.
Step 6.1.1 Clothes Swatches
For the Clothes, we'll use 2 swatches for the base and shadow:

Step 6.1.2 Clothes Base
Create a new layer and name it "Clothes Base." For the blue part of the clothes, I copied the base color from the original art and filled in the appropriate parts:

Step 6.1.3 Clothes Shadow
Duplicate the layer and rename it as "Clothes Shadow." Lock the transparent layer and fill in the shadow using your Pen Tool.

Step 6.2 Lining
Step 6.2.1 Lining Swatches
For the lining, we'll use 4 swatches. The middle part has a slight difference based on the original so we'll use 2 for the middle and 2 for the sleeves:


Step 6.2.2 Lining Base
Create new layer and name it as, "Lining Base." Fill in the zigzag shape on the sleeves and the middle part. Remember that they have different colors. Use the swatches above as guide.

Step 6.2.3 Lining Shadow
Duplicate the layer and name it as, "Lining Shadow." Add in the shadows same as the picture.

Step 6.3 Hands
The hand is the same as the skin on the head layer. We'll be using the same swatches and same style of shadowing with the light going from top and front.
Step 6.3.1 Hands Swatches
For the hand, I just copied the same as the head layer because they're exactly the same thing.
Step 6.3.2 Hands Base
Create a new layer. Name it, "Hands Base Color." Place it below the Body Lineart. Fill in the color with the base swatch.

Step 6.3.3 Hands Shadow
Duplicate the layer, and name it "Hands Shadow. Lock the Transparent Pixels. Using the Pen Tool, fill in the sides of the skin, and right above the sleeves.

Step 7 Staff Color
The staff is divided in 3 parts, the body and the gem which is divided into the base color, the inner glow and the outer glow.
Step 7.1 Staff Body
Step 7.1.1 Staff Swatches
For the Staff body, we'll use 3 swatches for the base, shadow and highlights:


Step 7.1.2 Staff Color Base
This step is easy. Create a new layer and name it as "Staff Color Base." Simply fill all the parts of the staff with the staff base swatch.

Step 7.1.3 Staff Color Shadow
Duplicate the layer and name it as, "Staff Color Shadow." Use The brush of 45 px, then using the Pen Tool, create vertical strokes, right click, then stroke as brush.

Step 7.1.4 Staff Color Highlights
Duplicate the layer and name it as, "Staff Color Highlights." Use The brush of 25 px, then using the Pen Tool, create vertical strokes, right click, then stroke as brush.

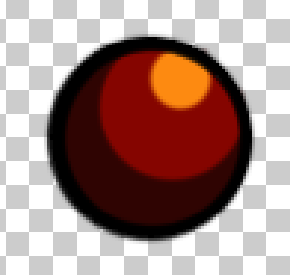
Step 7.2 Staff Gem
This part is the big red one up top. It has a dark red color with an inner glow.
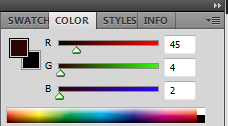
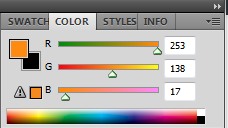
Staff 7.2.1 Gem Swatches
For the gem on the staff, we'll use a gradient for the base, inner glow and a gradient for the outer glow:
For the base color:

For the inner and outher glow gradients, these are the combination:


For the outer glow gradients, there's a slight difference and extra step which would make the color different even though they used the same swatches.
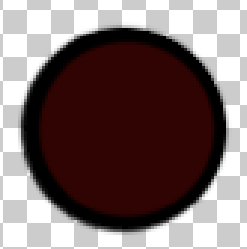
Staff 7.2.2 Gem Inner Glow
Create a new layer and name it, "Gem Inner Glow." Fill in the gem area like this with this swatch:

Then using the Gradient Tool, use the color combination listed above. Make sure to select the Radial Gradient option as well with the Normal mode.

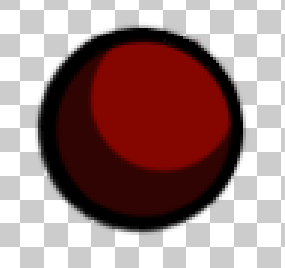
Staff 7.2.3 Gem Outer Glow
Create a new layer, and place it above the Gem Inner Glow Layer. Name it as, "Gem Outer Glow."
With the combination above, using the Gradient Tool, you also use the Radial Gradient option but this time, with the Hard Light mode.

Step 7.3 Smaller Gem
On the original one, there's no gems on the staff which I feel really out of place. I added it using the same one on the crown just scaled down and rotated and it fills like a glove.

PART II: Pre-Animation Stage
Step 8 Separating the Body Parts
We're going to need this extra step because we're going with a different style of animation for this week. We'll use last time's Body Swapping Method but this time, we'll also do what they call, "Rigging" or "Bone Animation," which I would tell you how to do step by step in the next part.
To do the rigging, we will need to properly separate the body parts that we're going to be using for the animation. I'm planning to have Prince Julian wave to the player while saying, "Good Luck," as his cheering method for your victory. So, we're going to need to separate the left and right arms.
For transparency, initially, I decided to rig also the elbows but the clothes kept getting in the way and for me to do that, I need to separate the body to the clothes or animate the clothes per frame. It would take unsurmountable amount of time so I scrapped it. I might do it in the future if I can prepare earlier.
Step 9 Merging the Colors and Lineart
It would be twice the work if we're going to animate the arms lineart, then the colors. Instead, we'll merge them first, then separate it from the body.
First, move the staff and its color counterpart and put it under Prince Julian's left hand.

I also added some shadow behind the staff that is touched by the hand so it would look like Prince Julian is grasping it.
Double check on the background if it is transparent. Transparent Background has a checkered pattern like this:

On your menu bar, click on Save As, then name it as, "Prince Julian Merged." Make sure you select PNG on the file type so it stays transparent after saving.
Step 10 Importing File
Open Photoshop again. Create a 1000 x 1000 canvas. Import Prince Julian Merged file by drag and dropping it on the canvas. Resize to fit the canvas.

Step 11 Separating the Body Parts
Using your Pen Tool or Magnetic Lasso Tool, surround the right arm part, then Layer Via Cut. This would create a new layer with the right arm and the body layer without one.

Do the same steps also on the left arm.

There's another thing we needed to separate, and that is the mouths. Following the same instructions previously, I created these mouths which we'll need for mouthing off the word "Good Luck."

I also made a mouthless head by cutting the mouth using "Layer Via Cut."

Step 12 Clean Up
First, we need to repair the same part of the body where the arm was cut. It's a bit hard to explain by words so simply follow the picture below:

It may not make sense that we did all those step to separate them only to be rebuilt in the animation stage, but we'll need to do this.
Step 13 Creating the Joints and Saving
These would be the last part before the animation stage. Using your Ellipse Tool, create a circle with the same size as the shoulder. Color it with the same swatch as the clothes since it's where it would attach to.

Save EACH of the assets and name it by parts. Save each as PNG so the transparency would remain the same.
Make sure each are saved individually and not as one file:

Edited in Canva Pro.
Woah. I haven't seen a detailed drawing process in a long time.
You made him more cute and friendly. 😊
Great job.
Keep it up.
!1UP
I wasn't planning to make a detailed guide. I'm just really talkative, lol.
Thanks for the tip. I appreciate it.
You have received a 1UP from @thecuriousfool!
@monster-curator, @oneup-curator, @fun-curator
And they will bring !PIZZA 🍕.
Learn more about our delegation service to earn daily rewards. Join the Cartel on Discord.
PIZZA Holders sent $PIZZA tips in this post's comments:
@curation-cartel(3/20) tipped @konaqua (x1)
Learn more at https://hive.pizza.