Splinterlands Art Contest 363 - Vulguine Wood Carved Necklace [ENG-ESP]


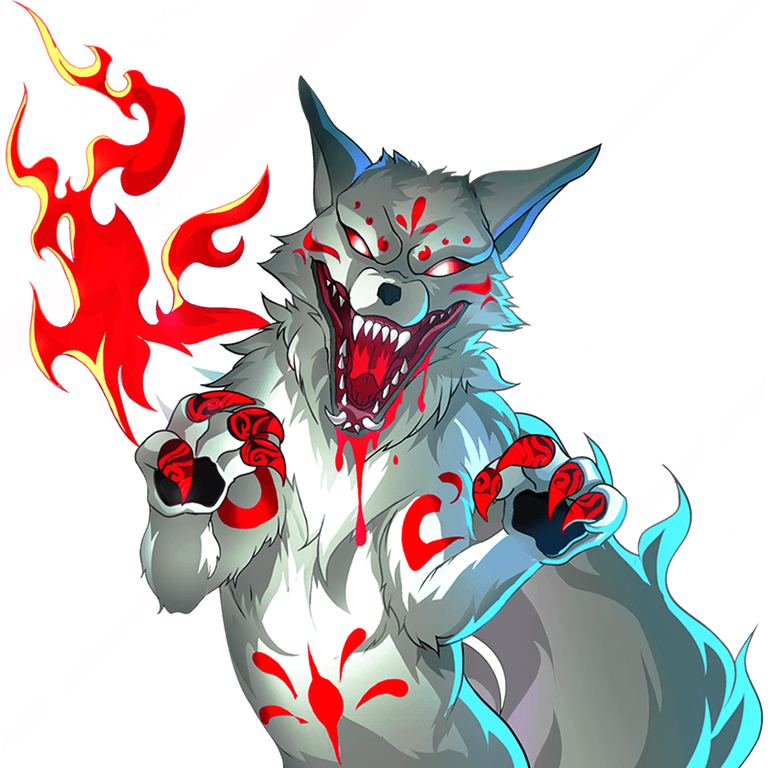
Hello, dear friends of Jewelry and also to all the friends of Splinterlands, my greetings to all the artists and artisans who gather each week for the weekly Splinterlands art contest. On this Sunday, I want to share with you a piece I made carved in wood. I chose the Vulguine card, a large white wolf, very fierce and powerful in battle. If we look closely, we can see that its design is somewhat humanized, seeing its limbs; this is what caught my attention the most. The piece I made is a figure looking in profile and has small cuts to give it a more tribal appearance. The piece is carved from pine wood, and to be able to cut it, I used various styles of blades to add the small details. Next, I want to show you how I made this piece, step by step, with more striking details. Let's begin!
Hola queridos amigos de Jewelry y también a los amigos de Splinterlands, mis saludos para todos los artistas y artesanos que cada semana se dan cita en el concurso de arte semanal de Splinterlands. En este día domingo quiero compartir con ustedes un trabajo que hice tallado en madera, escogí la carta Vulguine, un gran lobo blanco muy feroz y poderoso en batalla. Si miramos bien, podemos observar que su diseño esta un poco humanizado al ver sus extremidades, es lo que más llamó mi atención, la pieza que he realizado se trata de una figura que esta mirando de perfil y que tiene pequeños cortes para darle una apariencia más tribal. La pieza está tallada con madera de Pino y para poder cortarla utilicé varios estilos de cuchillas para hacer los pequeños detalles. A continuación quiero presentarles como hice esta pieza paso a paso con detalles más resaltantes. Comencemos!

 |  | |
|---|---|---|
 |  |
The first step is to choose the wood and cut a piece of suitable size. When I make wooden charms, I always use 3 cm. I think it's the most suitable, as it doesn't end up too big and the piece is still visible to the naked eye. After cutting the wood, in the clearest space, I begin to draw the silhouette of the card we chose—in this case, Vulguine. As I mentioned before, I made a minimalist design with tribal lines.
El primer paso es elegir la madera y cortar un trozo que sea de un tamaño adecuado, cuando hago dijes de madera siempre utilizo las medidas de 3 cm, me parecen las mas adecuadas ya que no queda muy grande y la pieza se puede observar a simple vista. Después de cortar la madera, en el espacio más limpio comienzo a dibujar la silueta de la carta que escogimos en este caso a Vulguine, que como mencioné antes hice un diseño minimalista pero con líneas tribales.
 |  | |
|---|---|---|
 |  |
Now, where do I start? My recommendation is always to choose the corners with the least amount of wood. I do this so the piece doesn't lose density too quickly and risk cracking. So I choose a corner with less wood to cut, and then I gradually work my way toward the part with the most wood. As you can see here, I started in the lower right corner, and cutting it was like cutting butter, hehe.
Ahora, ¿Por donde comenzar? mi recomendación siempre es elegir las esquinas que tengan menos madera, esto lo hago para que la pieza no pierda densidad muy rápido y corra el riesgo de agrietarse, por lo que escojo una esquina con menos madera que cortar y así me voy dirigiendo poco a poco hacia la parte donde hay mas madera. Como se puede apreciar aquí comencé por la esquina inferior derecha y cortarlo fue como cortar mantequilla jeje.
 |  | |
|---|---|---|
 |  |
In the second step, I begin cutting the wood following the outline in the upper right corner, the opposite of the previous step. I gradually cut the wood along the lines of the drawing. When I get close to the line, I change blades and use the wood carving gouges, using a flat-bladed one to go slowly and shape it without going outside the line.
En el segundo paso comienzo a cortar la madera siguiendo el traso en la esquina superior derecha, al contrario de la anterior. Voy cortando poco a poco la madera siguiendo el trazo del dibujo, cuando ya me voy acercando a la línea cambio de cuchillas y utilizo las gubias para tallar madera, una de hoja plana para ir lentamente y darle forma sin salirme de la línea.
 |  | |
|---|---|---|
 |  |
Now, in the third step, we change places and move to the lower left corner. Here, the drawing has a line with a very pronounced curve. To do this, I follow the same cutting technique with the utility knife. Once I've reached the very pronounced curve in the drawing, I use a gouge with a half-moon-shaped blade. This is specifically designed for making this type of cut. You can see the result of our piece up to this point.
Ahora, en el tercer paso cambiamos de lugar y nos mudamos a la esquina inferior izquierda, aquí el dibujo tiene un trazo con una curva muy pronunciada. Para hacerlo voy siguiendo la misma técnica de cortes con el cúter, una vez he llegado a la curva que esta muy pronunciada en el dibujo, utilizo una gubia que tiene la hoja de forma de media luna, esta es especial para hacer esta clase de cortes y así pueden observar como se ve el resultado hasta este punto de nuestra pieza.
 |  | |
|---|---|---|
 |  |
Finally, we cut the upper left part, specifically the part in front of the face. Here, I cut laterally and remove the wood with the tip of the knife. Fortunately, there weren't too many problems with this part of the piece, so the cut was relatively easy.
Por último cortamos la parte superior izquierda, concretamente la parte frente al rostro, aquí voy cortando de forma lateral y extrayendo la madera con la punta de la navaja. Afortunadamente en esta parte de la pieza no hubo mucho problema por lo que el corte fue relativamente facil.
 |  |  |
|---|---|---|
 |  |  |
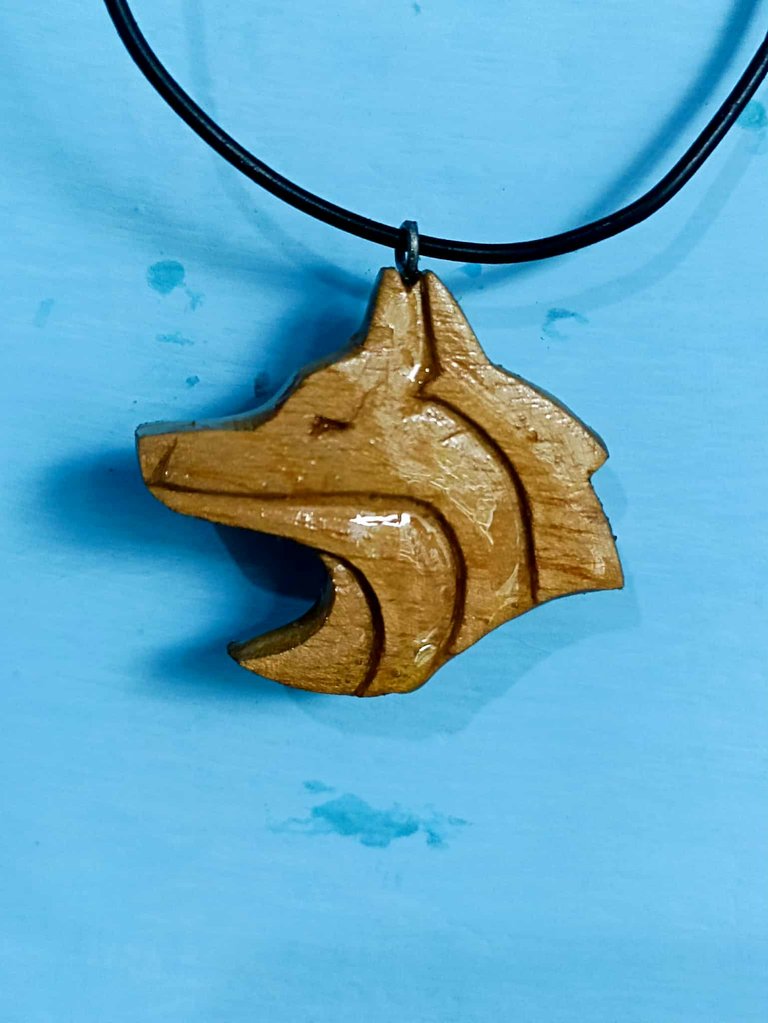
Then, for the final touches, I made some cuts inside the piece, giving it the appearance of a tribal symbol. Then I began sanding the entire piece until it was very polished and then applying a coat of varnish. Once the piece was dry, I placed the necklace on it, and that's how it was finished.
Luego en los últimos detalles para finalizar, hice algunos cortes al interior de la pieza, lo que da la aparicencia de un símbolo tribal. Después comencé a lijar toda la pieza hasta dejarla muy bien pulida para posteriormente aplicarle un baño de barniz. Una vez seca la pieza le coloqué el collar y así quedo finalizado.


What did you think of the result? The piece took a little longer to dry because there's little varnish left, so it becomes a little thicker, like wax. But once it dried, the piece looked just as I imagined. But let me know your opinion; it's very important to me, so the comments are there so you can express yourself. For now, I'll say goodbye, and I'll see you soon!
¿Qué les ha parecido el resultado? La pieza tardó un poco más en secarse porque el barniz ya queda poco, de manera que se torna un poco más espeso, como si fuera una cera. Pero una vez que secó la pieza quedó tal como la había imaginado. Pero déjame saber tu opinión, para mi es muy importante, así que ahi están los comentarios para que puedas expresarte. Por ahora me despido, y será hasta pronto!
Congratulations @fixie! You have completed the following achievement on the Hive blockchain And have been rewarded with New badge(s)
Your next payout target is 21000 HP.
The unit is Hive Power equivalent because post and comment rewards can be split into HP and HBD
You can view your badges on your board and compare yourself to others in the Ranking
If you no longer want to receive notifications, reply to this comment with the word
STOPDelegate Tokens and HP to Fallen Angels to earn weekly rewards!
Delegate | Join to the guild
Thanks!
!discovery 30
<3 <3
This post was shared and voted inside the discord by the curators team of discovery-it
Join our Community and follow our Curation Trail
Discovery-it is also a Witness, vote for us here
Delegate to us for passive income. Check our 80% fee-back Program
Thanks for the support