Chaos Evoker Decorative Pendant Quilling Technique [Eng-Esp]

Hello to all my Hive friends... 🐱
Today I am with you again to show you my art, I love every week to go through this wonderful world of magic, color, and lots of Splinterlands characters to look for new elements or characters to build different crafts such as jewelry, accessories, 3D figures and other things that motivate me, inspire me and activate my creativity and thus be able to create for you.
Today I am joining the Splinterlands Art Contest. I bring you a new work of art. I wanted to make a decorative pendant inspired by an element of the card, Chaos Evoker, using the quilling technique. I was very struck by the beautiful weapon of war that the character holds in his hands, and that's why I decided to bring it to life.
If you want to know more about the game, I leave you my reference link to enter it and navigate through this wonderful world: https://splinterlands.com?ref=dayadam
Hoping you like my work, without further ado, I leave you with my creative process.
Let's start:😃

Hola a toda mi gente de Hive... 🐱
Hoy estoy con ustedes nuevamente para mostrarles mi arte, me encanta semana a semana pasar por ese maravilloso mundo de magia, color, y muchísimos personajes de Splinterlands para buscar nuevos elementos o personajes para construir diversas manualidades bien sean bisutería, accesorios, figuras en 3D entre otras cosas que me motiven, inspiren y activen mi creatividad y de esa manera poder crear para ustedes.
Para hoy me uno al Splinterlands Art Contest. les traigo un nuevo trabajo de arte, quise realizar un Colgante decorativo inspirado en un elemento de la carta, Chaos Evoker en la técnica de quilling, me llamo mucho la atención el bello arma de guerra que posee el personaje en sus manos, y por eso decidí materializarlo.
Si quieren saber más con respecto al juego les dejo mi enlace de referencia para que ingresen en él, y naveguen por este maravilloso mundo: https://splinterlands.com?ref=dayadam
Esperando les guste mi trabajo, sin más preámbulos, les dejo mi proceso creativo.
Comencemos:😃
 |
 |
 |

• Cintas para quilling.
• Aguja para quilling.
• Cartulinas.
• Lápiz.
• Hija blanca.
• Guillotina de cortar papel.
• Plantilla para círculos.
• Argolla de bisutería.
• Alfiler de bisuteria.
• Palillo de madera.
• Masa Flexible.
• Pintura color negra.
• Pintura color roja.
• Pintura metalizada color oro.
• Pega blanca extra fuerte (de carpintería).
• Pincel.
• Tijera.
• Colgante de tu preferencia.
• Quilling strips.
• Quilling needle.
• Cardstock.
• Paper cutter.
• Pencil.
• White daughter.
• Template for circles.
• Jewelry ring.
• Jewelry pin.
• Wooden stick.
• Flexible clay.
• Black paint.
• Red paint.
• Gold metallic paint.
• Extra-strong white glue (carpentry glue).
• Paintbrush.
• Scissors.
• Pendant of your choice.

• Start by taking a 2 mm wide white ribbon and, using the needle, roll up the entire ribbon. Seal it with extra-strong white glue and remove it from the needle. You will end up with a small closed circle. You will need two identical circles.
• We will mold both on a 10 mm template, remove them from the template, and apply extra-strong white glue to the inside to prevent them from moving or deforming.
• Insert a jewelry pin through the hole at the top of the circle, apply glue and a piece of flexible dough, place the other circle on top, and wrap a white ribbon around them to join them together.
• Apply a coat of gold metallic paint to the piece and let it dry thoroughly.

• Vamos a comenzar tomando una cinta blanca de 2 mm de ancho, con la aguja procedemos a enrollar toda la cinta, sellamos con pega blanca extra fuerte sacamos de la aguja. Conseguiremos un pequeño círculo cerrado. Vamos a necesitar dos círculos iguales.
• Moldearemos ambos en una plantilla en la medida número 10 mm sacamos de la plantilla, aplicamos pega blanca extra fuerte por su parte interna para evitar que los mismos se muevan o se deformen.
• Colocaremos un alfiler de bisutería por el agujero que está encima del círculo, aplicaremos pega y un trozo de masa flexible, procedemos a colocar el otro círculo y pasamos una cinta blanca alrededor para unirlos.
• Apliqué a la pieza una capa de pintura metalizada color oro, deje secar muy bien.
 |  |
 |  |
• I took a white sheet of paper and a pencil and drew a small sketch of the piece I wanted to make.
• I took some red cardstock, folded it several times, and applied extra-strong white glue to make it thicker. I let the glue dry thoroughly.
• Once the cardstock was dry, I cut out the sketch I had drawn to obtain the piece I needed.
• Procedí a tomar una hoja blanca con un lápiz, elabore un pequeño boceto de la pieza que quiero realizar.
• Tomé cartulina de color rojo, realicé varios dobleces aplicando pega blanca extra fuerte para hacerla más gruesa, deje secar muy bien la pega.
• Una vez seca la cartulina, procedía a cortar el boceto que había elaborado obteniendo la pieza que necesito.
 |  |
• I took a wooden stick, red and black paint, applying one color to half and the other color to the other half.
• Once all the pieces were ready, I assembled them harmoniously using extra-strong white glue, letting them stick together well. I also applied a thick layer of glue to the entire piece to laminate it and make it even harder.
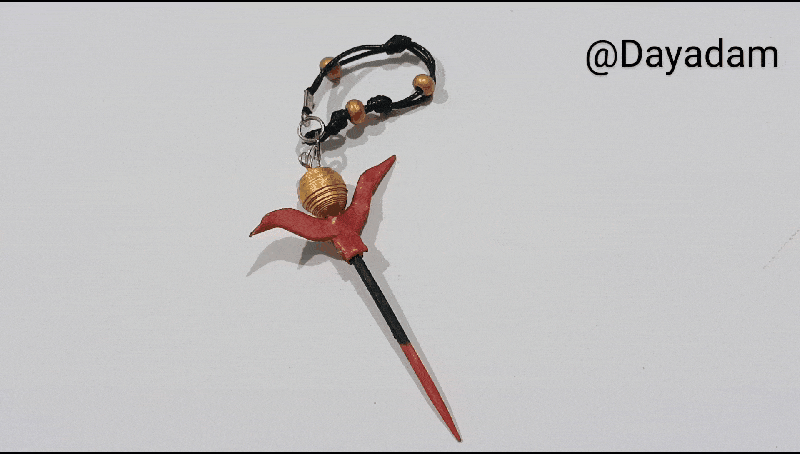
• Finally, I added a jewelry ring and a thin black snakeskin pendant decorated with gold pearls.
• And that's how we finished this decorative 3D pendant, inspired by the weapon of the character from the card “Chaos Evoker”.
• Tomé un palillo de madera, pintura color rojo y negra, aplicando en la mitad de un color y en la otra mitad del otro color.
• Listas todas las piezas fui ensamblando todas con pega blanca extra fuerte de manera armónica, deje pegar muy bien. También apliqué una capa gruesa de pega a toda la pieza, para plastificarla y endurecerla aún más.
• Para finalizar, coloqué una argolla de bisutería y un colgante de piel de serpiente fina de color negra, decorada con perlas dorada.
• De esta manera tenemos listo este colgante decorativo en 3D que elabore, inspirado en el arma del personaje de la carta "Chaos Evoker".
 |  |  |

|
 |
 |
 |  |
|
 |

What did you think, did you like it?
I hope you did, I hope you liked my explanation, procedure and photos, I made them with love for you.
"Let out that muse that inspires you, and let your imagination fly".
Thank you all, see you next time.
¿Que les pareció, les gustó?
Espero que sí, que les haya gustado mi explicación, procedimiento y fotos, los hice con mucho cariño por y para ustedes.
"Deja salir esa musa que te inspira, y deja volar tu imaginación".
Gracias a todos, nos vemos en la próxima.
Banner y separador hecho por mí en Canva

https://www.reddit.com/r/crafting/comments/1o7uuxq/decorative_pendant_using_quilling_technique/
This post has been shared on Reddit by @dayadam through the HivePosh initiative.
Qué lindo accesorio amiga, me encantó la inspiración, estuve viendo como haces las bolitas, muhahaha, creo que ya sé, vamos a ver la practica. <3