Fairy-Tale Forest: Foam Mushroom & Gnome DIY
Hola, comunidad de Hive!
Para los amantes de las manualidades y los mundos fantásticos, hoy les comparto cómo crear un encantador bosque de cuento de hadas con gnomo y hongos de foami moldeable. Perfecto para decorar espacios o regalar con un toque mágico. 🌿🍄✨
Hello, Hive community!
For craft lovers and fantasy enthusiasts, today I’ll show you how to create a whimsical fairy-tale forest with moldable foam gnomes and mushrooms—perfect for adding magical decor or gifting a touch of enchantment. 🌿🍄✨

A continuación les mostré paso a paso la realización de mi trabajo. Comenzaré mostrando los materiales
Next, I'll show you step by step how I made my project. I'll start by displaying the materials.


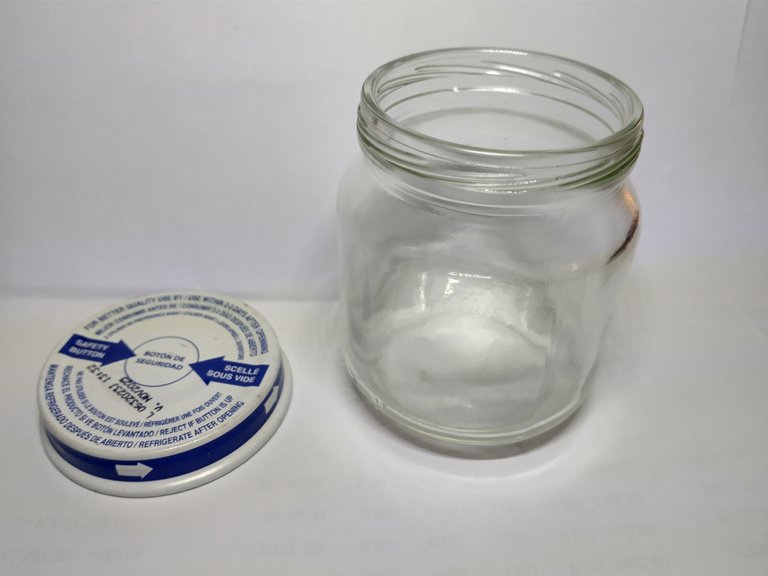
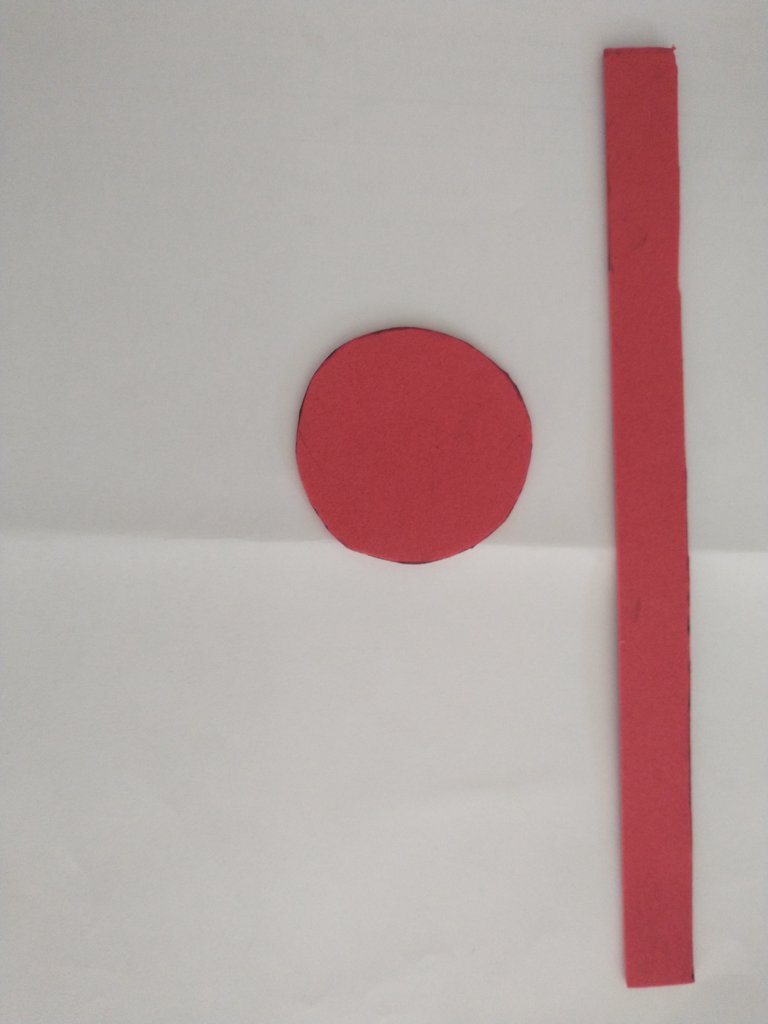
MATERIALES/ MATERIALS
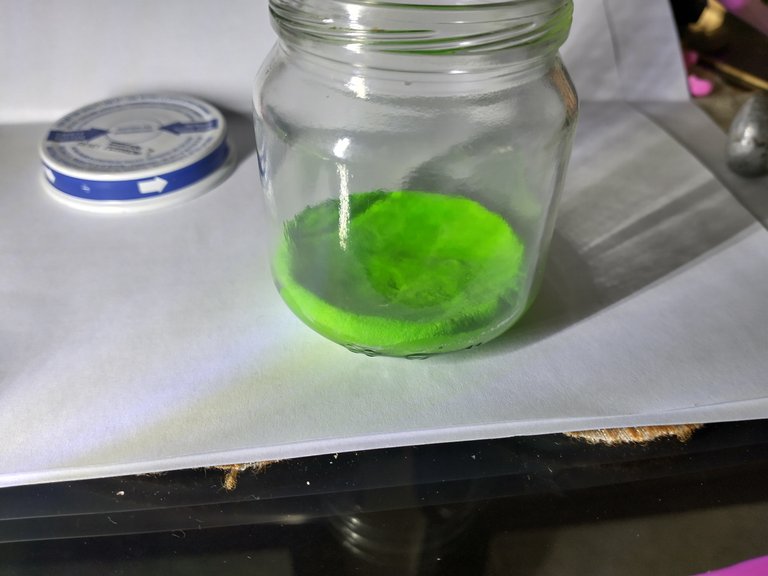
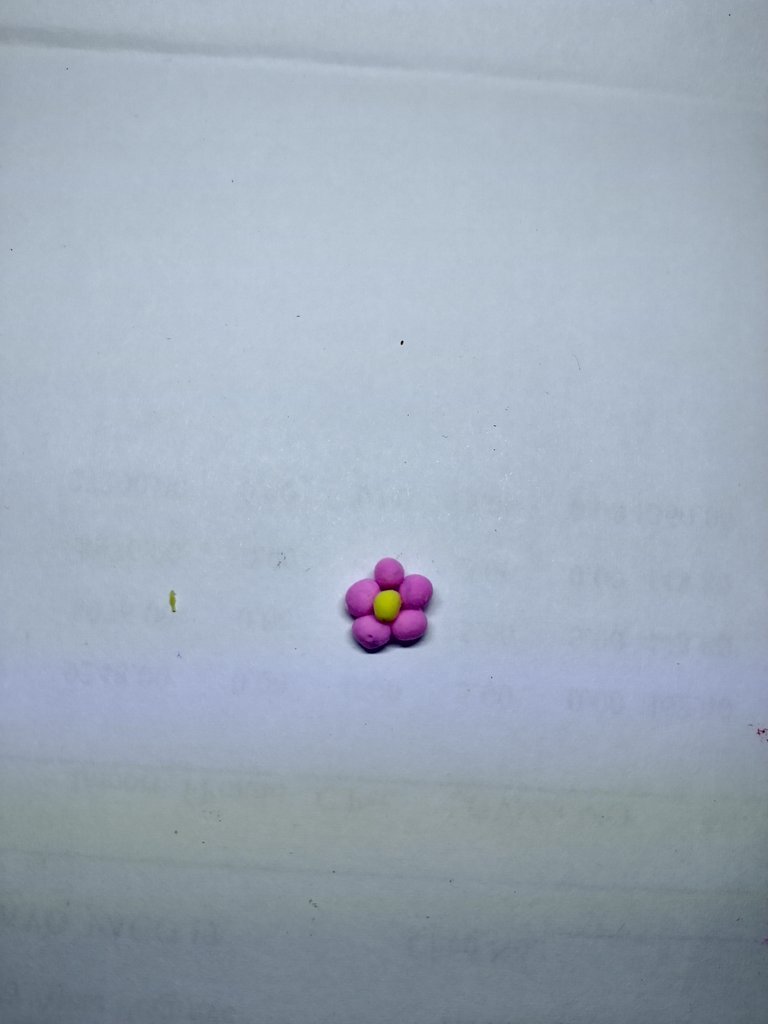
Step / Paso 1
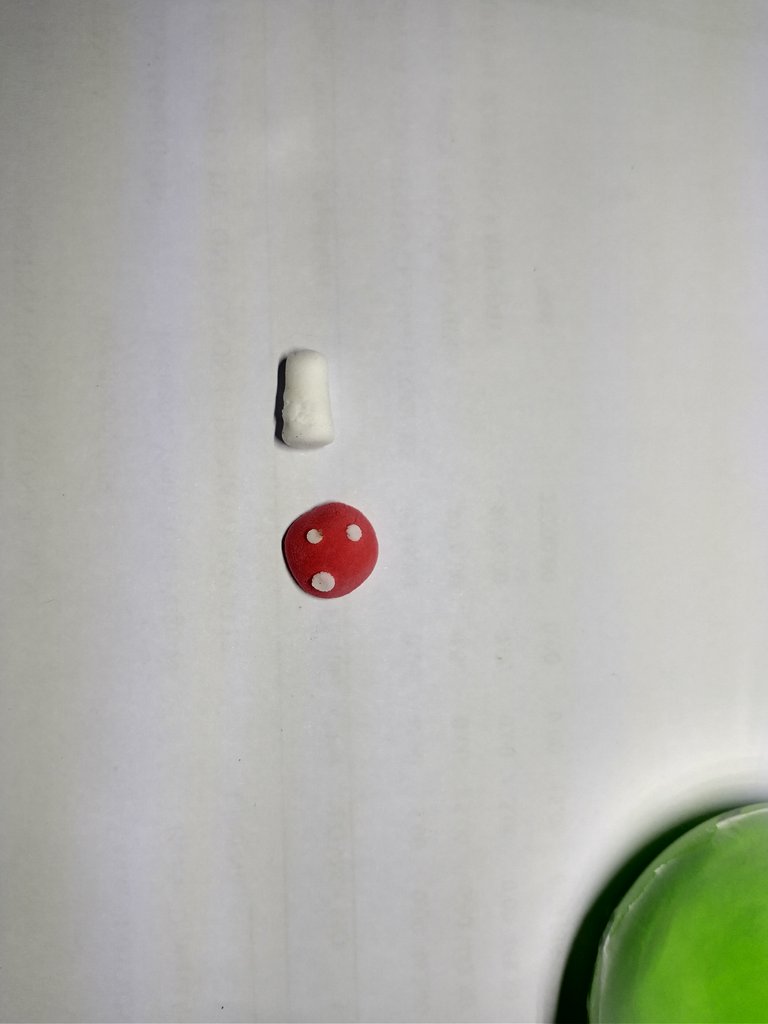
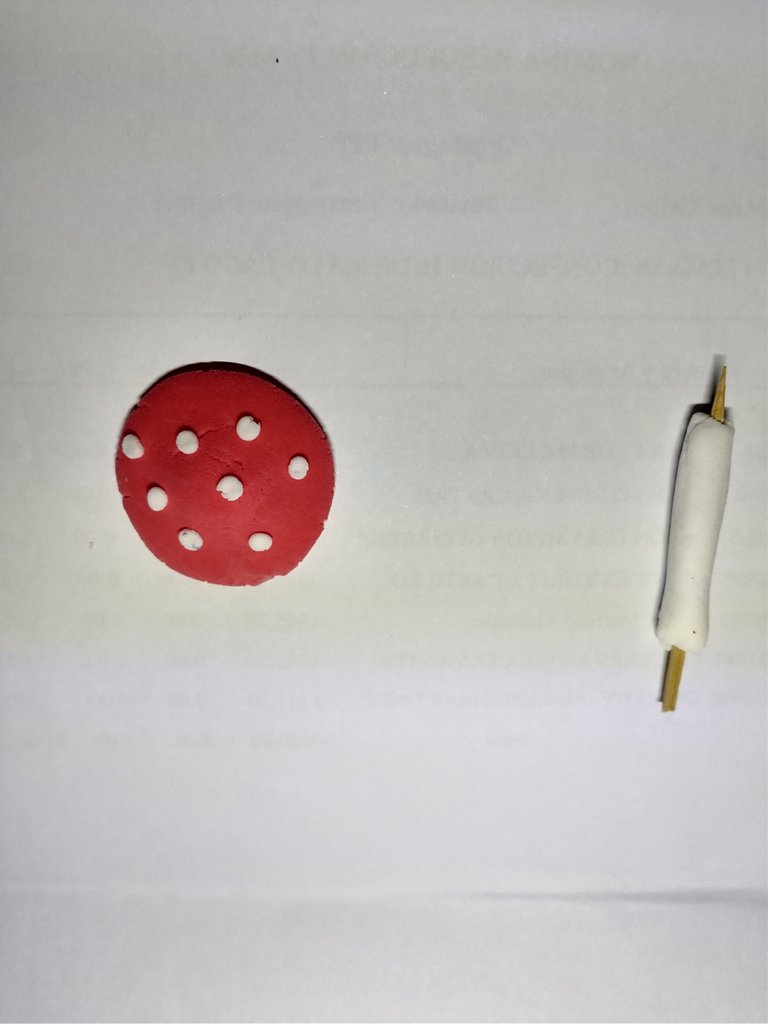
Para comenzar, prepararemos la base utilizando foami moldeable verde, dándole la forma deseada dentro del envase para que quede firme y uniforme. A continuación, elaboraremos las flores formando cinco pequeños círculos aplanados que servirán como pétalos, y un círculo más pequeño en foami amarillo para el centro, uniéndolos con cuidado para que queden bien distribuidos. Para los hongos, crearemos primero un cilindro blanco que funcionará como tallo. Luego, moldearemos una esfera roja, la aplanaremos ligeramente por un lado para formar el sombrero y le agregaremos pequeños puntos blancos para darle un toque realista. Finalmente, fijaremos el sombrero sobre el tallo y colocaremos tanto los hongos como las flores en la base verde, utilizando una herramienta puntiaguda como un palillo o alfiler para asegurar cada pieza en su lugar con precisión.
To begin, we’ll prepare the base using green moldable foam, shaping it to fit snugly and evenly inside the container for a firm, uniform foundation. Next, we’ll craft the flowers by forming five small flattened circles as petals, along with a smaller yellow foam circle for the center, carefully assembling them to ensure even distribution. For the mushrooms, we’ll start by creating a white cylinder as the stem. Then, we’ll mold a red sphere, flatten one side slightly to form the cap, and add small white dots for a realistic touch. Finally, we’ll attach the cap to the stem and place both the mushrooms and flowers onto the green base, using a pointed tool like a toothpick or pin to secure each piece precisely in place.


Step / Paso 2
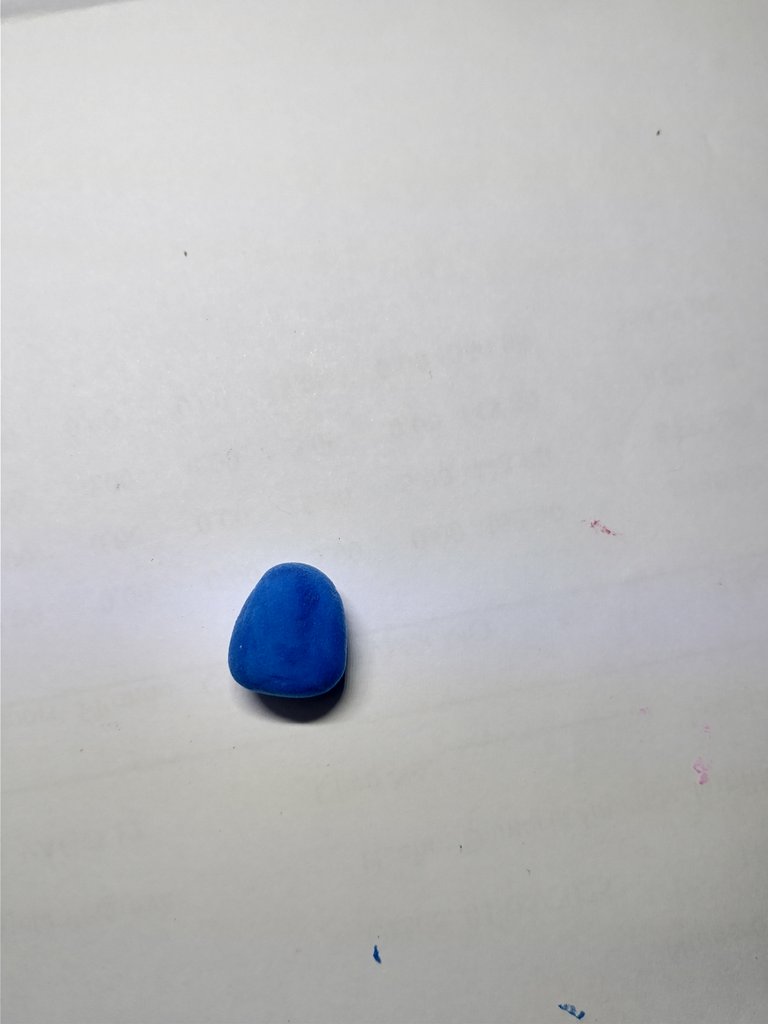
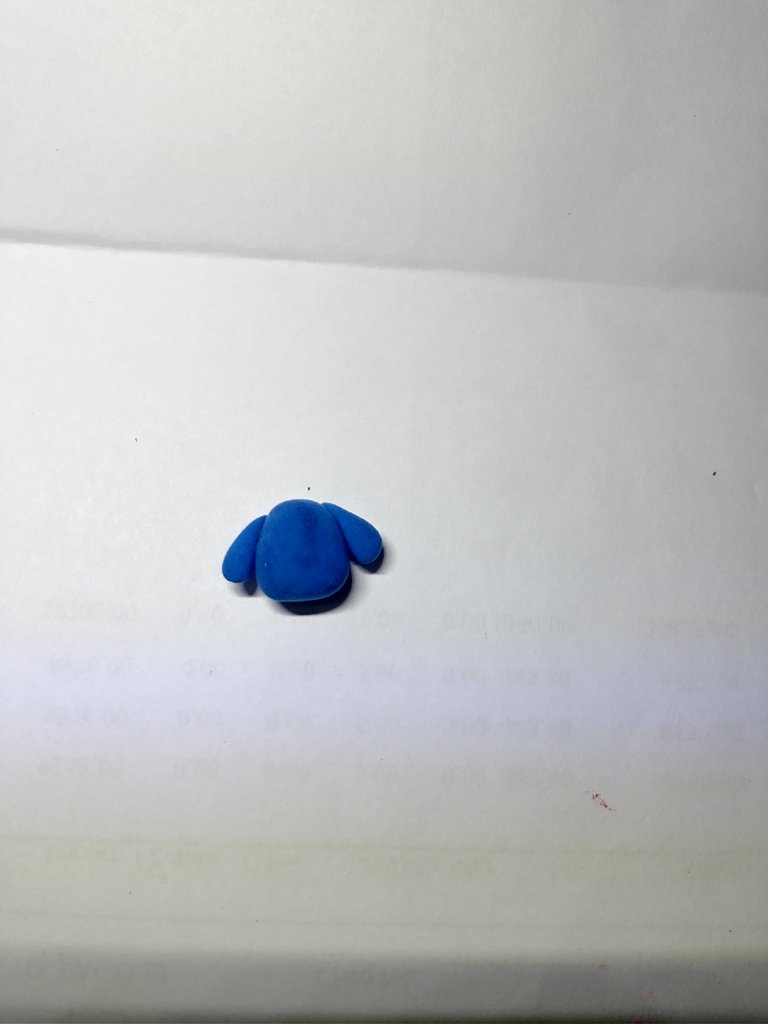
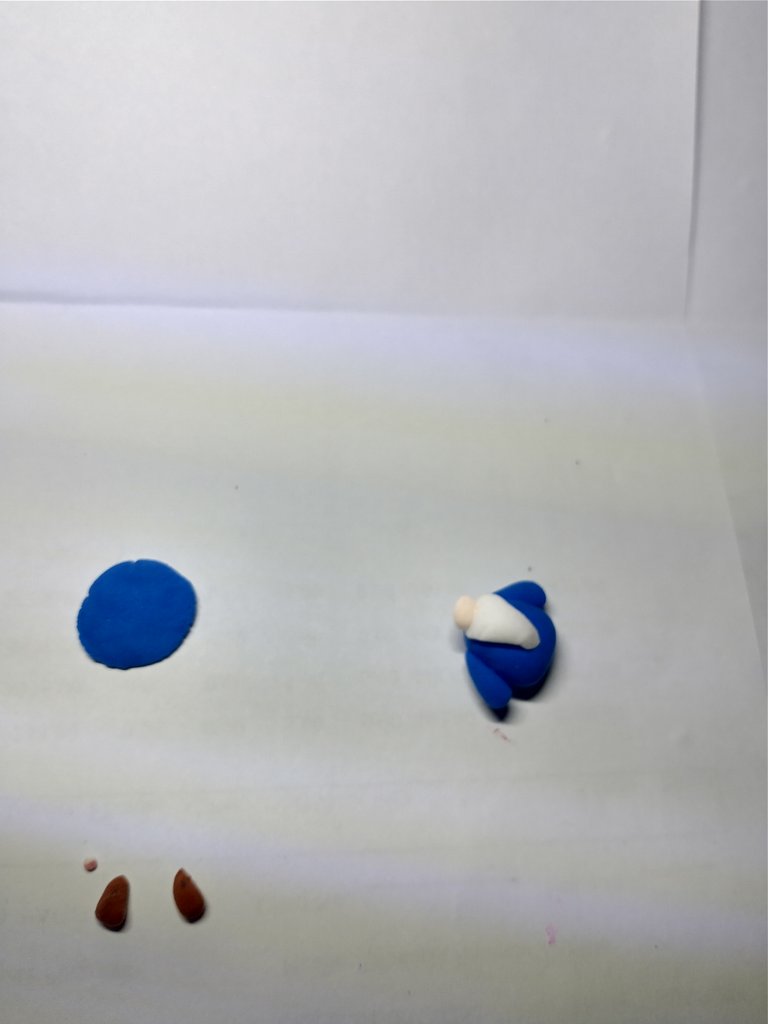
Continuaremos con el gnomo y el hongo mayor. Para crear el gnomo, comenzaremos moldeando su cuerpo en color azul. Sobre el torso, colocaremos un triángulo blanco para formar la barba y encima añadiremos una pequeña bola beige que servirá como nariz. El gorro se elaborará con un círculo azul que irá sobre la cabeza, y sobre este colocaremos un cono con la punta doblada para crear la clásica punta del sombrero gnomo. Los brazos se formarán con dos gotas azules, mientras que las botas seguirán el mismo diseño pero en un tamaño más pequeño
We’ll continue with the gnome and the largest mushroom. To create the gnome, we’ll start by shaping its body in blue. On the torso, we’ll place a white triangle to form the beard, and on top of that, we’ll add a small beige ball to serve as the nose. The hat will be made from a blue circle placed over the head, and on top of this, we’ll add a cone with a folded tip to create the gnome’s classic pointed hat. The arms will be shaped from two blue teardrops, while the boots will follow the same design but on a smaller scale.


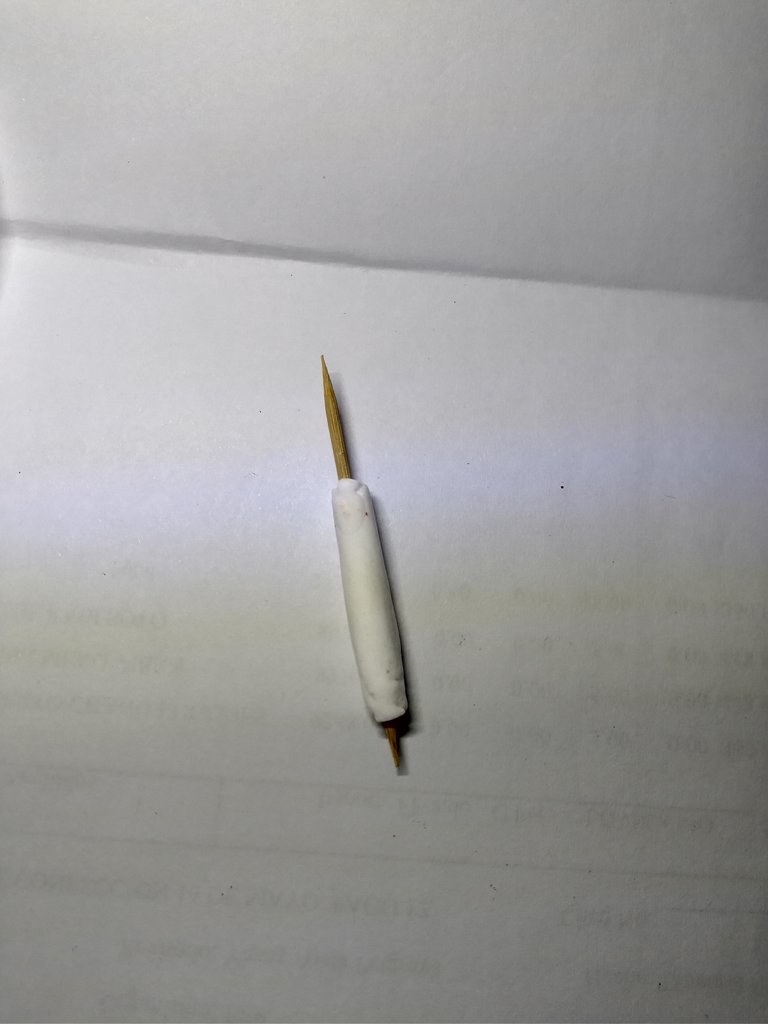
El hongo más grande lo haremos casi igual que los pequeños, pero para la base usaremos un palillo de dientes como esqueleto. Esto le dará resistencia y ayudará a que mantenga su forma.
We’ll make the largest mushroom almost the same way as the small ones, but for the base, we’ll use a toothpick as a skeleton. This will give it strength and help it hold its shape.


Step / Paso 3
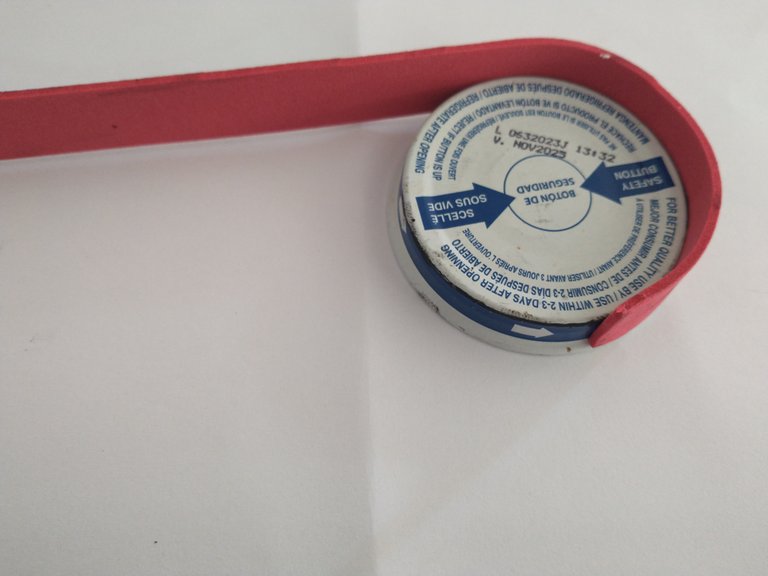
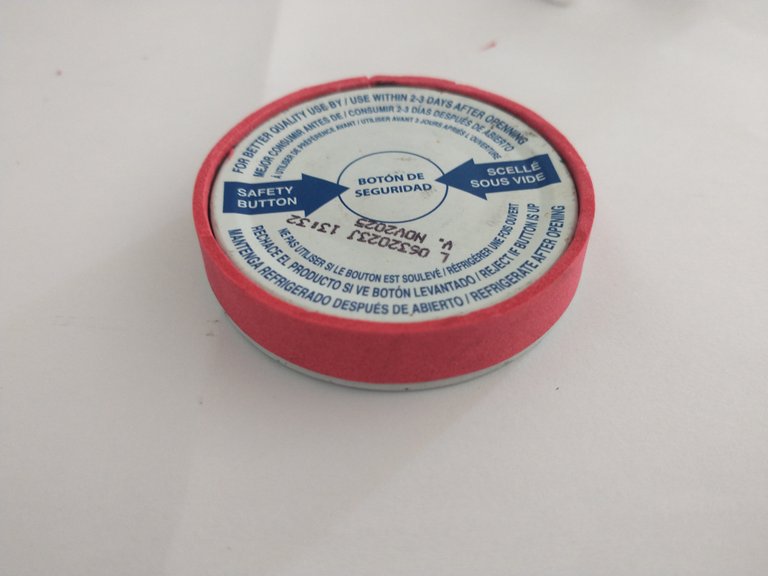
Para finalizar, decoraremos la tapa utilizando foami rojo. Comenzaremos marcando y recortando un círculo del mismo tamaño que la parte superior de la tapa. Luego, cortaremos un listón lo suficientemente largo para cubrir todo el borde exterior. Aplicaremos pegamento sobre el borde y colocaremos el listón, presionando con firmeza para que se adhiera bien. Si sobra material, recortaremos el excedente con tijeras para lograr un acabado limpio. Finalmente, pegaremos el círculo de foami en la parte superior de la tapa, asegurándonos de que quede bien centrado y fijado.
To finish, we will decorate the lid using red foam. We’ll start by marking and cutting out a circle the same size as the top of the lid. Then, we’ll cut a strip long enough to cover the entire outer edge. We’ll apply glue along the edge and place the strip, pressing firmly to ensure it adheres well. If there’s excess material, we’ll trim it with scissors for a clean finish. Finally, we’ll glue the foam circle onto the top of the lid, making sure it’s well-centered and securely attached.

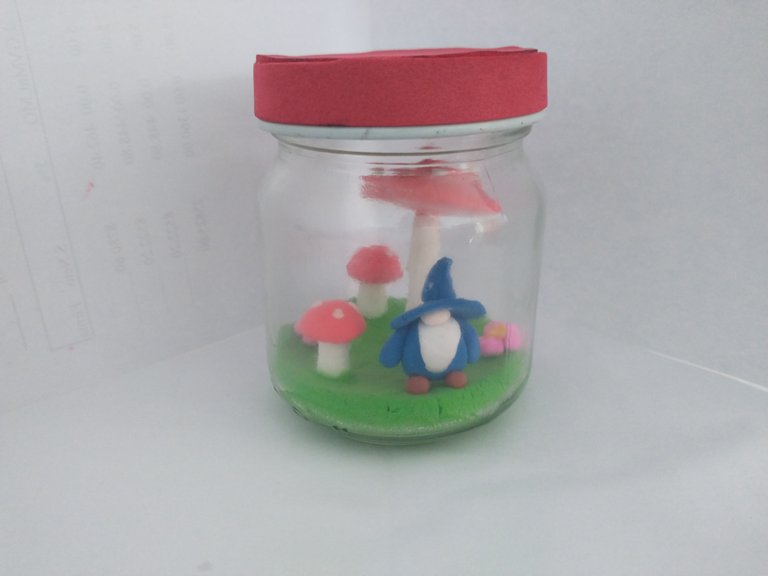
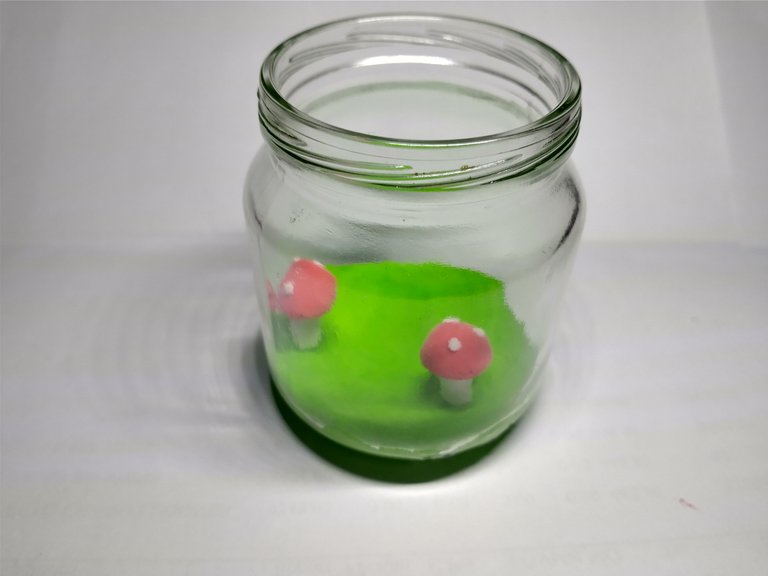
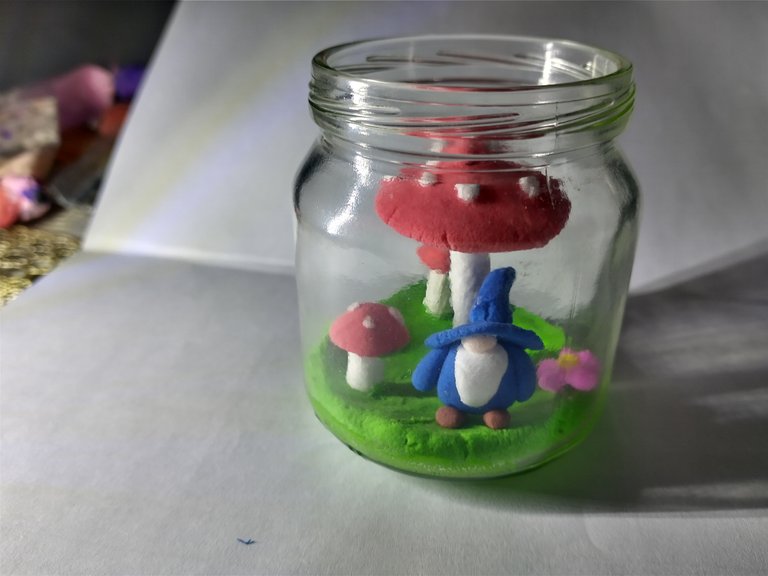
Resultado / Result
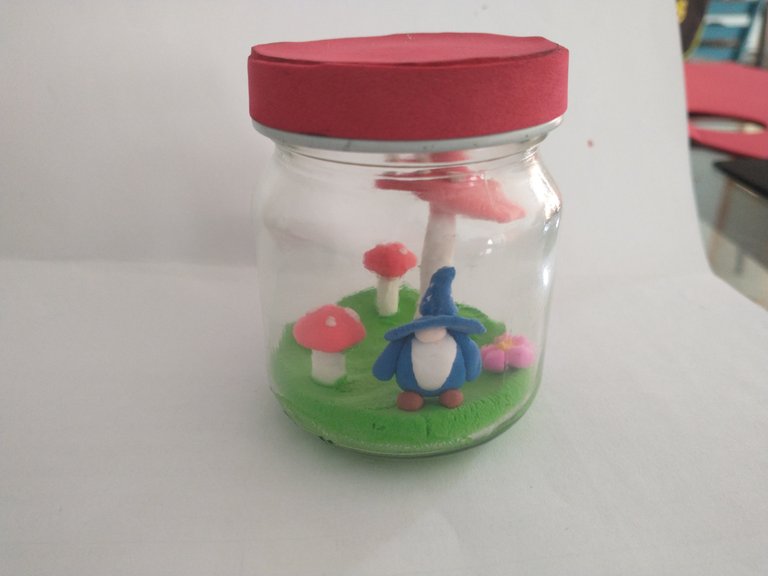
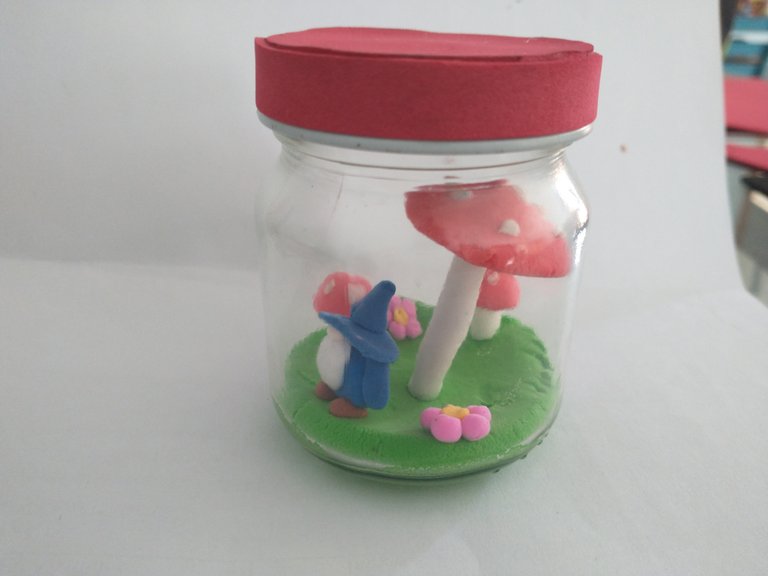

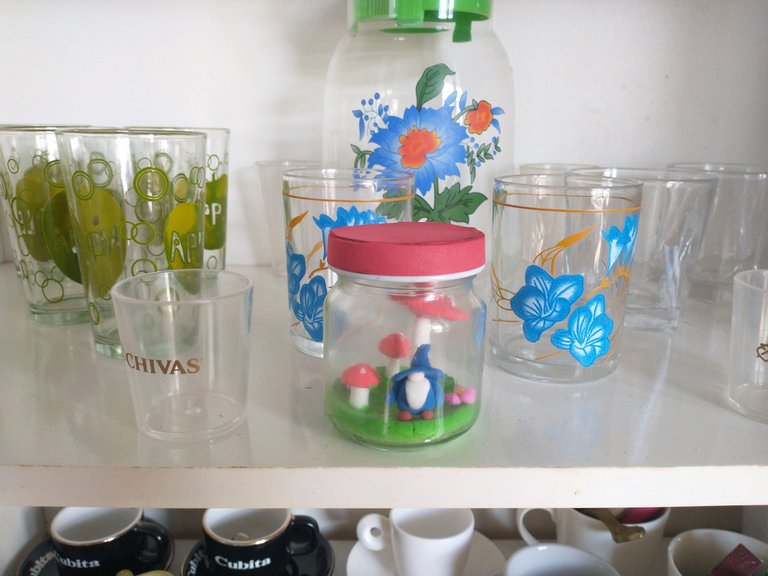
El diseño del gnomo y los hongos, así como la realización paso a paso y las fotografías del proceso, fueron creados completamente por mí para este bosque de cuento de hadas en foami
The design of the gnome and mushrooms, along with the step-by-step crafting process and documentary photos, were entirely created by me for this foam fairy-tale forest.
Si te ha gustado el post, no olvides dejar tu comentario y seguirme para próximas publicaciones. Me encantaría saber tu opinión e ideas para el siguiente. Saludos 😊
If you liked the post, don't forget to leave a comment and follow me for future posts. I'd love to know your opinion and ideas for the next one. Regards
It feels so good to be able to decorate our spaces with things we create ourselves. This turned out nice, well done and thanks for sharing.
selected by @ibbtammy
Congratulations @csrlos85! You have completed the following achievement on the Hive blockchain And have been rewarded with New badge(s)
Your next payout target is 250 HP.
The unit is Hive Power equivalent because post and comment rewards can be split into HP and HBD
You can view your badges on your board and compare yourself to others in the Ranking
If you no longer want to receive notifications, reply to this comment with the word
STOPCheck out our last posts: