DIY: Stole inspired by Rune Arcanist (Eng - Esp)


Hello, hello fellow yarn and needle lovers! I hope you have a wonderful and blessed week with your loved ones. November is flying by, and December, the month of Christmas, is just around the corner—the most colorful and beautiful month when we celebrate the birth of Jesus. This time, I'm sharing a project inspired by the characters of Splinterlands. It's a beautiful blue scarf with gold edges and white stars in the center, based on the character Rune Arcanist, who wears a scarf as part of her outfit. This scarf also matches her top. Her pants are gold and black, which coordinates perfectly with the scarf and top. The project is easy to make and requires few materials. I'll show you the process.
Stoles or scarves are a very useful accessory at academic events. They usually feature the institution's emblem or logo at one end. It's common to see students happily wearing their scarves at school graduations, signifying their advancement to the next grade or stage of their education. This accessory is also used during the Christmas season, complementing outfits with a hat and gloves in colder climates. Christmas figures like snowmen, penguins, and Santa Claus often wear stoles, usually made of plaid fabric, which is characteristic of this time of year. At various Christmas-related activities and celebrations, people often wear scarves decorated with reindeer, Santa Claus, penguins, snowmen, Christmas trees, and other motifs, giving them a unique style typical of this beautiful season characterized by colorful decorations and lights to celebrate and remember the birth of Jesus.

Hola, hola amigos amantes de los hilos y las agujas deseo que tengan una excelente y bendecida semana en unión de sus seres queridos, el mes de noviembre va avanzando muy rápido desde mi punto de vista y ya faltan pocos días para la llegada de Diciembre el mes de la Navidad, el más colorido y bonito donde celebramos el nacimiento de Jesús; en esta ocasión Les comparto un proyecto inspirado en los personajes de Splinterlands, este consiste en una hermosa bufanda azul con los bordes dorados y estrellas blancas en el centro tomando como referencia al personaje Rune Arcanist, que lleva en su atuendo una bufanda en los brazos, está también van a juego con su top, el pantalón es de color dorado con negro que combina muy bien con la estola y el top, el proyecto es sencillo de hacer y requiere pocos materiales, les muestro el proceso de elaboración.
Las estolas o o bufandas son un accesorio de gran utilidad en los actos académicos, estás regularmente llevan en uno de los extremos el distintivo o logo de la institución, es común en las graduaciones escolares ver a los chicos portar muy feliz su bufanda, que indica el paso de grado o etapa; en la época navideña también se usa este accesorio que complementa el vestuario con un gorro y guantes en las zonas con climas fríos, los muñecos navideños como los de nieve pingüinos y santa suelen llevar una estola generalmente con tela de cuadro que son características de esta época, en las diferentes actividades y celebraciones vinculadas con la Navidad las personas acostumbran a llevar sus bufandas decoradas con renos, santas, pingüinos, muñecos de nieve, arbolito, entre otros que le dan un estilo único y propio de esta hermosa temporada caracterizada que destaca por las decoraciones coloridas y luces para celebrar y recordar el nacimiento de Jesús


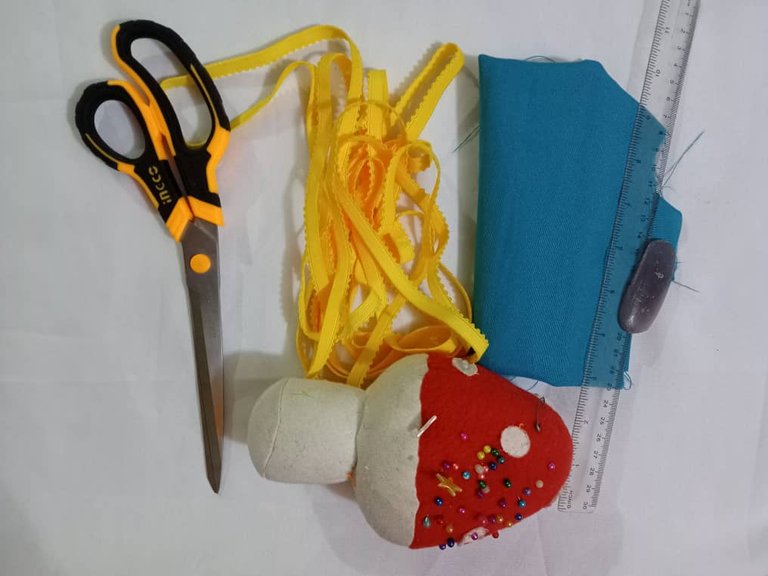
The materials used were:
Gabardine fabric
Bias tape
Ruler
Tack chalk
Pins
Scissors
Sewing machine
Stars
Silicone
Los materiales usados fueron:
Tela de gabardina Sesgo
Regla
Jaboncillo
Alfileres
Tijera
Máquina de coser
Estrellas
Silicón
Elaboration
The first step for this simple project was to cut a rectangle measuring 60 by 14 centimeters, then I folded it in half and at the ends I marked the corners by going down 4 centimeters towards the center and marked a triangle on each of them, I put the fabrics right sides together and pinned them.
Elaboración
El primer paso para este sencillo proyecto, fue cortar un rectángulo de 60 por 14 centímetros, luego doblé por la mitad y en los extremos marqué las esquinas bajando 4 centímetros hacia el centro y marqué un triángulo en cada uno de ellos, enfrenté las telas por el derecho y sujeté con alfileres.

Then I sewed the corners, using the previous lines as a guide, double-stitched them to secure, and removed the excess fabric.
When removing the excess fabric from the ends of the scarf, it's important to make a small snip that doesn't touch the seam. This will allow the center to have a triangular shape and the corners to have a better finish. You must be very careful when making the snip, leaving a distance of approximately 0.3 to 0.5 millimeters. With the help of small scissors, you can make this cut, and the triangular shape of the scarf will look very nice.
Luego cosí las esquinas, tomando como referencia las líneas anteriores, pasé doble costura para asegurar y retiré el exceso de tela.
Al retirar el exceso de tela en los extremos de la bufanda, es importante hacer un piquete que no toque la costura, pues este permitirá que el centro tenga la forma triangular y las esquinas queden con un mejor acabado, se debe tener mucho cuidado al momento de hacer el piquete dejando una distancia aproximada entre 0,3 milimetros y 0,5 milimetros; con ayuda una tijera pequeña se puede hacer este corte y la forma triangular de la bufanda se verá muy bien.


The next step was to close the sides using a straight stitch, leaving an opening of approximately 10 centimeters for turning. Once the stitching was finished, I turned the piece right side out and used a toothpick to pull out the corners.
After turning the piece inside out, and for a better finish, I went over the entire edge of the stole using a straight stitch. I also closed the opening where I turned the piece right side out.
El siguiente paso fue cerrar los laterales utilizando para ello puntada recta, dejé una abertura de aproximadamente 10 centímetros para voltear, terminada la costura volteé la pieza y con ayuda de un palillo de altura saqué las esquinas.
Volteada la pieza y para un mejor acabado, repisé todo el contorno de la estola utilizando puntada recta, también cerré la abertura por dónde volteé la pieza.


The last step was attaching the bias tape. I started at one corner using a decorative stitch, then covered the other side and glued on the stars using hot glue. With these simple steps, a lovely stole inspired by the characters of Splinterlands is finished.
El último paso fue pegar el sesgo, inicié en una de las esquinas utilizando puntada decorativa, luego cubrí el otro lado y pegué las estrellas usando un punto de silicón caliente, con estos sencillos pasos está terminada una linda estola inspirada en los personajes de Splinterlands.

This project is easy to make and can be used as a guide for making stoles for children finishing the school year. According to my consultation with the sewing teacher, the estimated width of the stole is between 10 and 12 centimeters, and the fabrics used should preferably be stiff enough to keep the stole firm.
Este proyecto es sencillo de hacer y se puede utilizar como guía para hacer la estolas de los chicos que terminan el año escolar, según mi consulta con la profesora de costura el ancho estimado de la estola es entre 10 y 12 centímmetros y las telas a usar son preferiblemente las rígidas que permitan mantener la estola firme .
Blessings!
Bendiciones!
Hasta luego!
Translated with https://www.deepl.com/translator
              All images are my own.


   Todas las imágenes son de mi autoría,
Thank you so much
Delegate Tokens and HP to Fallen Angels to earn weekly rewards!
Delegate | Join to the guild
Thank you
Feliz lunes de agujas, mi querida amiga, me gusta mucho tu inspiración sobre el personaje, la bufanda quedo genial.
Saludos amiga, me alegra que te haya gustado, es sencilla de hacer y útil para las graduaciones.
Thanks for the support @qurator and @brumest
Thanks for sharing! - @cieliss

Thank you for your support.
Best regards!