[ENG/ESP] Summoner University: The Power of Buffs in Splinterlands
🔹 Introduction: The Power of Buffs in Splinterlands
First, I want to express my gratitude for the incredible support from the community. Every discussion, battle report, and shared insight has helped shape this project into something bigger than I ever imagined. Thank you for being part of my #play2earn journey!
When building a team, I always ask myself: How can I create a formation where every ability strengthens the whole lineup? Battles aren’t just about picking strong monsters—they're about synergy, where buffs amplify each unit’s impact and turn a good team into a great one.
Now, after covering defense and offense, it’s time to dive into buffs—the abilities that enhance strength, resilience, and efficiency on the battlefield. Used correctly, buffs can help your team strike first, survive longer, and hit harder, often deciding the outcome of a match.
Beyond strategy, my goal with this series is to help new players unlock the true depth of #Splinterlands. By creating clear guides and infographics, I hope to make the game’s complexity more accessible and contribute to the growth of the community.
This chapter will explore five essential buff categories, their impact, best synergies, and how to use them effectively to build an unstoppable team.
Let’s get started! 🚀🔥
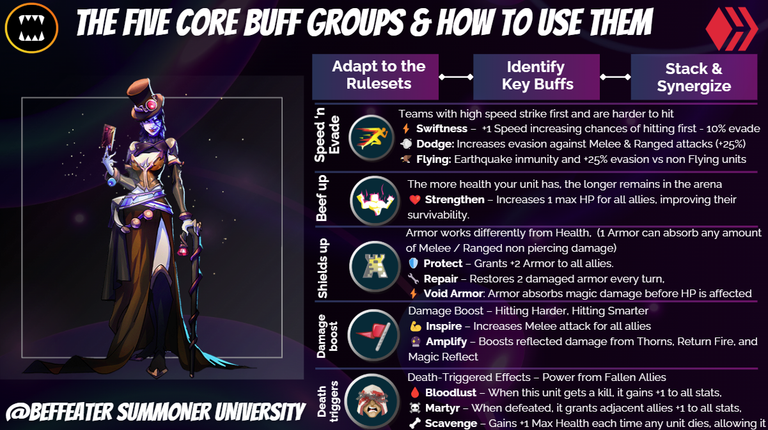
🛡️ The Five Core Buff Groups & How to Use Them!
Buffs are essential for maximizing your team’s potential—they improve speed, durability, and attack power, making your lineup more efficient and resilient in battle. By understanding how to apply and combine buffs, you can build dominant teams that adapt to any challenge.
🔹 The Three-Step Buffing Strategy:
1️⃣ Adapt to the Ruleset – Some battle rules limit buffs (Back to Basics removes abilities, Weak Magic negates armor), while others make them even more valuable.
2️⃣ Identify Key Buffs for Your Strategy – Which buffs will improve your team’s survivability, attack power, or speed control?
3️⃣ Stack & Synergize – Combining Swiftness + Inspire creates fast, hard-hitting teams, while Protect + Repair makes tanks much harder to break.
Mastering buffs is not just about using them—it’s about knowing when and how to combine them for maximum impact. Here's the infographic I've made for the five Core Buffs Group!
⚡ Speed Buff in Action – Outspeeding Akane & Venka’s Deadly Ambush!
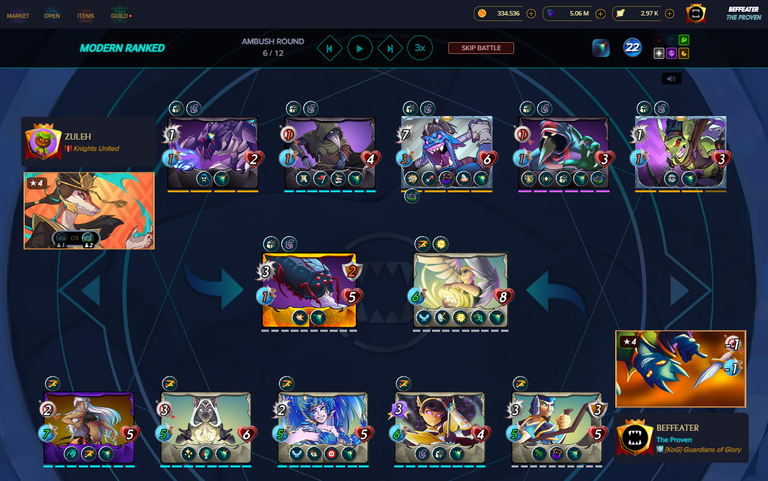
In a 22-mana battle with the Deflection Shield ruleset, I had to face the fearsome combo of Akane and Venka. This pair is known for destroying enemy teams in the first turn, using speed and power to hit before the opponent can react.
In this kind of battle, there is only one real chance to survive: bet everything on evasion. And to evade, you need more speed. I knew that if I could not outspeed Akane, my team would fall before doing anything.
I trusted Quix the Devious, and with his speed debuff combined with my team’s buffs, I managed to have a +3 speed advantage over Akane. This small difference became the key to victory.
Thanks to this speed advantage, I was able to trigger several important evades that stopped Akane’s first attacks, allowing my team to stay alive, regroup, and counterattack. Step by step, I turned the battle around and achieved a victory that seemed impossible!
💡 What I learned: In ambush battles, where the first turn is everything, speed is your best weapon! If you can outrun and dodge the enemy’s strongest attacks, you give yourself the chance to win. ⚔️🔥 Watch the entire battle
❤️ The Hidden Power of +1 Health – Surviving Against All Odds!

Sometimes, we ignore small buffs like +1 Health, thinking they are not important. But this small point can make the difference between a unit surviving or being defeated in a key moment.
In this battle, I faced a 13-mana match against the dangerous Akane & Zebajin combo. With so little mana, every decision counted. I decided to surprise my opponent by placing Ujurak in the front line. Some people might think this was risky, but I trusted Ujurak’s strength.
During the ambush phase, Ujurak took a strong hit… and survived with just one health left! That single point allowed Olivia’s Mimic to finish the fight and give me the victory.
💡 What I learned: Do not underestimate small buffs. Even one health point can change everything. Every NFT we add to our deck can help in ways we don’t expect. The little details often make the biggest difference! ⚔️🔥Note that both my cards were current rewards ^^ Watch the battle
🛡️ Mastering Armor – Winning by Understanding the Ruleset!
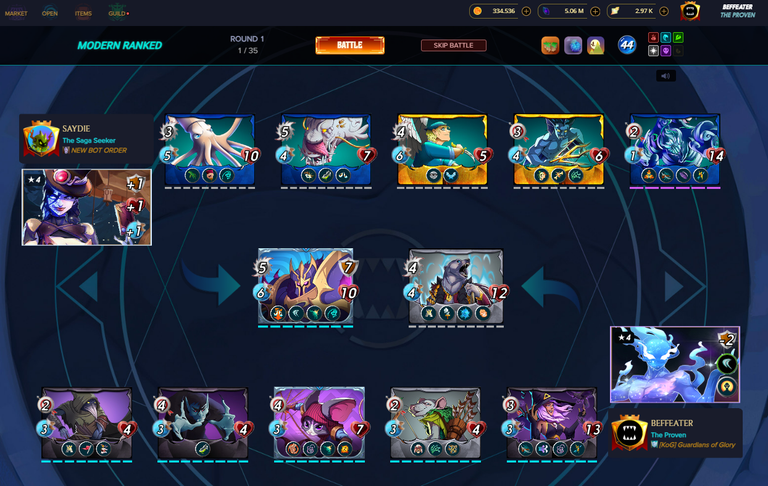
Frequently, victory comes from understanding the whole context of a combat and using it in your favour. This battle is a great example of how learning the game mechanics can decide the result.
I faced a 44-mana battle with Earthquake, No Magic, and No Legendaries. In Earthquake battles, units take damage every round unless they can fly or have enough armor to survive the hits. My plan was clear: protect my team with armor and make it last.
I chose Arkemis the Bear and Ravenhood Warden for their Protect ability, giving extra armor to my whole team to resist both enemy attacks and the earthquake damage. I also made an important choice — I placed Ravenhood Warden in the backline. Why? Because with Astral Entity’s resurrection, having Protect units in the first and last positions increases the chance that, if one dies, it will come back and continue protecting the team.
That good planning helped my monsters survive the earthquake while my opponent’s team slowly fell apart. In the end, understanding armor mechanics and resurrection positioning gave me a strong and well-earned victory!
💡 Lesson learned: Earthquake rulesets are not only about flying — sometimes, smart use of armor, Protect, and good positioning can make all the difference. Know the rules, plan your moves, and you will win more battles! ⚔️🔥 Watch the battle
⚔️ Surprise Strategy – Chaos Knight Leading the Charge!
I love battles where you can surprise your opponent with an unexpected move, and this fight was exactly that!

In a 17-mana battle with Melee Mayhem, Deflection Field, and Aimless combat, most players choose predictable cards. But I decided to do something different — I used Chaos Knight, a card that many players no longer consider. Her play rate has gone down, but I saw the chance to show her true value.
I placed Chaos Knight as my main tank, and with her Inspire ability, she boosted the attack of all my melee units. In a Melee Mayhem battle, where every monster can attack from any position, this extra damage becomes very powerful.
The result? My team attacked harder from every position, quickly taking down enemy monsters. My opponent was not ready for this surprise, and the extra damage gave me a clear victory. Watch entire battle
💡 Lesson learned: Sometimes, the cards that people forget are the most dangerous. Chaos Knight may not be popular, but with the right plan, she can lead your team to victory! Never be afraid to surprise your opponent — it can win the battle! ⚔️🔥
🌿 Nature’s Power – Martyrs and Buffs for Victory!

I love current Nature dynamics where there's easy access to Martyr units. In this battle, that was exactly what gave me the advantage.
It was a 24-mana battle with Deflection Shield, Lost Legendaries, and Earthquake. The key to winning was boosting the right units at the right moment.
I placed my favourite Halaran Huntress in the centre of my formation (I really love this unit — and the best part is that we got her for free!). She was surrounded by two martyrs, who gave her a lot of extra damage and survivability when they fell. With each martyr's sacrifice, she became stronger and more resistant to both the enemy attacks and the earthquake damage.
Also, my Thunderhoof Nomad made a great contribution, bringing extra resilience and helping my team hold on until Halaran could finish the battle.
💡 Lesson learned: In battles where Earthquake and special rulesets change everything, Nature’s martyrs and smart buffs can make the difference. Choose wisely, boost your key units, and watch them lead you to victory! 🌿⚔️🔥Watch entire battle
🙏 Thank You for Joining Me on This Journey!
This brings us to the end of this chapter about buffs and their impact on the battlefield. I truly hope you enjoyed reading it as much as I enjoyed putting it together.
I want to once again thank the entire Splinterlands community for the amazing support, comments, battle reports, and every small contribution that helps this project grow day by day. My humble goal is to help new players discover the true depth of the game, and continue learning alongside the most experienced ones.
💬 I would love to hear from you:
- Which buff do you use the most?
- What’s been your most epic battle thanks to an unexpected buff?
- Do you have any “forgotten” card that surprised you like Chaos Knight did for me?
Please feel free to drop a comment and share your experience! Every bit of feedback helps us grow as players and as a community.
⚔️ See you on the battlefield, summoners! And… get ready, because in the next chapter, we might dive into the debuffing strategy! 🌟
From the battlefield, #Beffeater signing off! 🎮 See you in the arena!
Here is my referral in case you want to jump aboard and begin to #play2earn from today
In case you need guidance on your first moves, feel free to reach on twitter 📱🐦 @beffeater, or my ambassador discord
🔹 Introducción: El poder de los Buffs en Splinterlands
Primero, quiero expresar mi gratitud por el increíble apoyo de la comunidad. Cada conversación, reporte de batalla y consejo compartido han ayudado a dar forma a este proyecto, convirtiéndolo en algo mucho más grande de lo que había imaginado. ¡Gracias por ser parte de este camino!
Cuando armo un equipo, siempre me pregunto: ¿Cómo puedo crear una formación donde cada habilidad fortalezca a todo el grupo? Las batallas no se tratan solo de elegir monstruos fuertes, sino de sinergia, donde los buffs multiplican el impacto de cada unidad y convierten un buen equipo en uno imparable.
Ahora, después de haber cubierto defensa y ataque, es momento de sumergirnos en los buffs: esas habilidades que mejoran la fuerza, resistencia y eficiencia en el campo de batalla. Usados correctamente, los buffs pueden ayudar a tu equipo a atacar primero, resistir más tiempo y golpear más fuerte, muchas veces marcando la diferencia entre ganar o perder.
Más allá de la estrategia, mi objetivo con esta serie es ayudar a los nuevos jugadores a descubrir la enorme profundidad de Splinterlands. Creando guías claras e infografías, quiero hacer que la complejidad del juego sea más fácil de entender y así contribuir al crecimiento de nuestra comunidad.
En este capítulo, exploraremos cinco categorías esenciales de buffs, su impacto, mejores sinergias y cómo usarlos de forma efectiva para construir un equipo imparable.
¡Vamos a ello! 🚀🔥
🛡️ Los cinco grupos principales de Buffs y cómo usarlos
Los buffs son esenciales para sacar el máximo potencial de tu equipo: mejoran la velocidad, la resistencia y la capacidad de ataque, haciendo que tu formación sea más sólida y eficiente en combate. Al comprender cómo aplicarlos y combinarlos, podrás armar equipos dominantes capaces de adaptarse a cualquier reto.
🔹 La estrategia de 3 pasos para buffear:
1️⃣ Adáptate a las reglas de batalla — Algunas reglas limitan los buffs (Back to Basics elimina habilidades, Weak Magic anula la armadura), mientras que otras los vuelven aún más importantes.
2️⃣ Identifica los buffs clave para tu estrategia — ¿Qué buffs mejorarán la supervivencia, ataque o control de velocidad de tu equipo?
3️⃣ Combina y crea sinergias — Usar Swiftness + Inspire genera equipos veloces y letales, mientras que Protect + Repair convierte a tus tanques en auténticas murallas.
Dominar los buffs no es solo saber usarlos, sino entender cuándo y cómo combinarlos para lograr el máximo impacto. ¡Aquí te dejo la infografía que he creado sobre los 5 grupos de Buffs!
⚡ Buff de velocidad en acción – Superando la emboscada mortal de Akane y Venka
En una batalla de 22 de maná con la regla Deflection Shield, tuve que enfrentarme a la temible combinación de Akane y Venka. Esta pareja es famosa por aniquilar equipos enemigos en el primer turno, usando velocidad y potencia para atacar antes de que puedas reaccionar.
En este tipo de combate, solo hay una forma real de sobrevivir: apostarlo todo a la evasión. Y para evadir, necesitas más velocidad. Sabía que si no lograba superar a Akane en velocidad, mi equipo caería sin poder responder.
Confié en Quix the Devious, y gracias a su debuff de velocidad combinado con los buffs de mi equipo, conseguí una ventaja de +3 en velocidad sobre Akane. Esta pequeña diferencia fue la clave de la victoria.
Gracias a esa ventaja, logré evitar varios ataques importantes, permitiendo que mi equipo sobreviviera, se reagrupase y contraatacara. Poco a poco, cambié el curso de la batalla y conseguí una victoria que parecía imposible.
💡 Lo que aprendí: En batallas donde la emboscada es clave, la velocidad es tu mejor arma. Si logras ser más rápido y esquivar los ataques más duros del enemigo, te das la oportunidad de ganar. ⚔️🔥 Mira la batalla completa aquí.
❤️ El poder oculto del +1 de salud – ¡Sobreviviendo contra todo pronóstico!
A veces ignoramos pequeños buffs como el +1 de salud, pensando que no son importantes. Pero ese pequeño punto puede ser la diferencia entre que una unidad sobreviva o caiga en un momento clave.
En esta batalla, me enfrenté a un combate de 13 de maná contra la peligrosa combinación de Akane y Zebajin. Con tan poco maná, cada decisión era crucial. Decidí sorprender a mi oponente colocando a Ujurak en primera línea. Muchos pensarían que fue arriesgado, pero confié en la resistencia de Ujurak.
Durante la fase de emboscada, Ujurak recibió un golpe muy fuerte... ¡y sobrevivió con solo un punto de vida! Ese pequeño margen le dio a Olivia’s Mimic la oportunidad de terminar la batalla y darme la victoria.
💡 Lo que aprendí: Nunca subestimes los buffs pequeños. Incluso un solo punto de vida puede cambiar todo. Cada NFT que agregamos a nuestro mazo puede ayudarnos en formas inesperadas. Los pequeños detalles a menudo marcan la gran diferencia. ⚔️🔥 Mira la batalla completa aquí.
🛡️ Dominando la armadura – Ganando gracias al conocimiento del ruleset
Muchas veces, la victoria llega al comprender el contexto de la batalla y saber usarlo a tu favor. Esta batalla es un gran ejemplo de cómo el conocimiento de la mecánica puede decidir el resultado.
Me enfrenté a una batalla de 44 de maná con Earthquake, No Magic y No Legendaries. En las batallas de Earthquake, las unidades reciben daño cada ronda a menos que puedan volar o tengan suficiente armadura para resistir. Mi plan fue claro: proteger a mi equipo con armadura y resistir.
Elegí a Arkemis the Bear y Ravenhood Warden por su habilidad Protect, dando armadura extra a todo mi equipo para resistir ataques enemigos y el daño del terremoto. Además, coloqué a Ravenhood en la última posición, para asegurar que, con la resurrección de Astral Entity, si moría, pudiera volver y seguir protegiendo a mis aliados.
Gracias a esa planificación, mis monstruos resistieron mientras el equipo enemigo se desmoronaba. En el final, entender la mecánica de la armadura y la colocación correcta me dio una victoria merecida.
💡 Lección aprendida: Las reglas de Earthquake no solo se tratan de volar — a veces, el uso inteligente de armadura, Protect y posicionamiento marcan toda la diferencia. Estudia las reglas, planea tus movimientos y ganarás más batallas. ⚔️🔥 Mira la batalla completa aquí.
⚔️ Estrategia sorpresa – ¡La Caballero del Caos liderando el combate!
¡Me encantan las batallas donde puedes sorprender a tu oponente con un movimiento inesperado, y esta fue exactamente una de esas!
En una batalla de 17 de maná, con las reglas Melee Mayhem, Deflection Field y Aimless, la mayoría de jugadores elige cartas predecibles. Pero yo quise hacer algo distinto: usé a Chaos Knight, una carta que muchos han dejado de lado. Su tasa de uso ha bajado, pero vi la oportunidad de demostrar su verdadero valor.
Coloqué a Chaos Knight como mi tanque principal, y gracias a su habilidad Inspire, aumentó el ataque de todas mis unidades de ataque cuerpo a cuerpo. En un combate con Melee Mayhem, donde todos los monstruos pueden atacar desde cualquier posición, este buff es increíblemente fuerte.
¿El resultado? Mi equipo golpeó más fuerte desde todas las posiciones, eliminando rápidamente a los monstruos enemigos. Mi oponente no estaba preparado para esta sorpresa, y el daño extra me llevó a una victoria clara.
💡 Lección aprendida: A veces, las cartas olvidadas son las más peligrosas. Chaos Knight puede que ya no sea popular, pero con la estrategia correcta, puede liderar tu equipo hacia la gloria. ¡No tengas miedo de sorprender — puede darte la victoria! ⚔️🔥 Mira la batalla completa aquí.
🌿 El poder de la naturaleza – Mártires y buffs para la victoria
Me encanta la dinámica actual de Naturaleza, donde es fácil acceder a unidades con Mártir. En esta batalla, fue exactamente eso lo que me dio la ventaja.
Era una batalla de 24 de maná, con las reglas Deflection Shield, Lost Legendaries y Earthquake. La clave para ganar fue potenciar a las unidades correctas en el momento justo.
Coloqué a mi querida Halaran Huntress en el centro de mi formación (¡me encanta esta carta — y lo mejor es que nos la dieron gratis!). La rodeé de dos mártires, que al caer le dieron muchísimo daño extra y mayor resistencia. Con cada sacrificio, Halaran se volvía más fuerte y resistente tanto a los ataques enemigos como al daño por terremoto.
Además, mi Thunderhoof Nomad tuvo un gran papel, aportando resistencia extra y ayudando a mantener la formación estable hasta que Halaran pudo acabar el combate.
💡 Lección aprendida: En batallas donde el terremoto y reglas especiales limitan tus opciones, los mártires y buffs inteligentes de Naturaleza pueden ser el factor decisivo. Escoge bien, potencia a tus unidades clave y observa cómo te llevan a la victoria. 🌿⚔️🔥 Mira la batalla completa aquí.
¡Claro! Aquí tienes una propuesta para el cierre del post, en un tono humilde, cercano y motivador:
🙏 ¡Gracias por acompañarme en esta aventura!
Hasta aquí llega este capítulo sobre los buffs y su impacto en el campo de batalla. Espero de corazón que hayas disfrutado leyendo tanto como yo he disfrutado creándolo.
Quiero agradecer de nuevo a toda la comunidad Splinterlands por el apoyo, los comentarios, los reportes de batalla y cada pequeña aportación que hace que este proyecto crezca día a día. Mi objetivo es humilde: ayudar a nuevos jugadores a descubrir toda la profundidad del juego, y seguir aprendiendo junto a los más experimentados.
💬 Me encantaría saber tu opinión:
- ¿Qué buff utilizas más a menudo?
- ¿Cuál ha sido tu batalla más épica gracias a un buff inesperado?
- ¿Tienes alguna carta olvidada que te haya sorprendido como a mí la Chaos Knight?
¡Te invito a dejar un comentario y compartir tu experiencia! Cada aporte enriquece este camino y nos ayuda a crecer como jugadores y como comunidad.
⚔️ ¡Nos vemos en la arena, summoners! Y... ¡prepárate, porque en el próximo capítulo podría ser el turno de hablar de la estrategia del debuffing! 🌟
Desde el campo de batalla, #Beffeater se despide. 🎮🔥
Here is my referral in case you want to jump aboard and begin to #play2earn from today
In case you need guidance on your first moves, feel free to reach on twitter 📱🐦 @beffeater, or my ambassador discord
Thanks for sharing! - @azircon

Congratulations @beffeater! You have completed the following achievement on the Hive blockchain And have been rewarded with New badge(s)
Your next target is to reach 72000 upvotes.
You can view your badges on your board and compare yourself to others in the Ranking
If you no longer want to receive notifications, reply to this comment with the word
STOPCheck out our last posts:
As always mate, you are creating excellent Splinterlands content, especially for newer players. Keep up the great work!
Thank you very much my friend! None of this work would make sense without OG's like you supporting me to carry on! Lots of love from Barcelona! #Vonak